Remember the Mystery Challenge I took part in back in May? (If not, check it out HERE) Well, Jessica over at The Berry Bunch just posted a Round Up of all the bloggers who participated. Go check it out!!
May 2015 Mystery Challenge
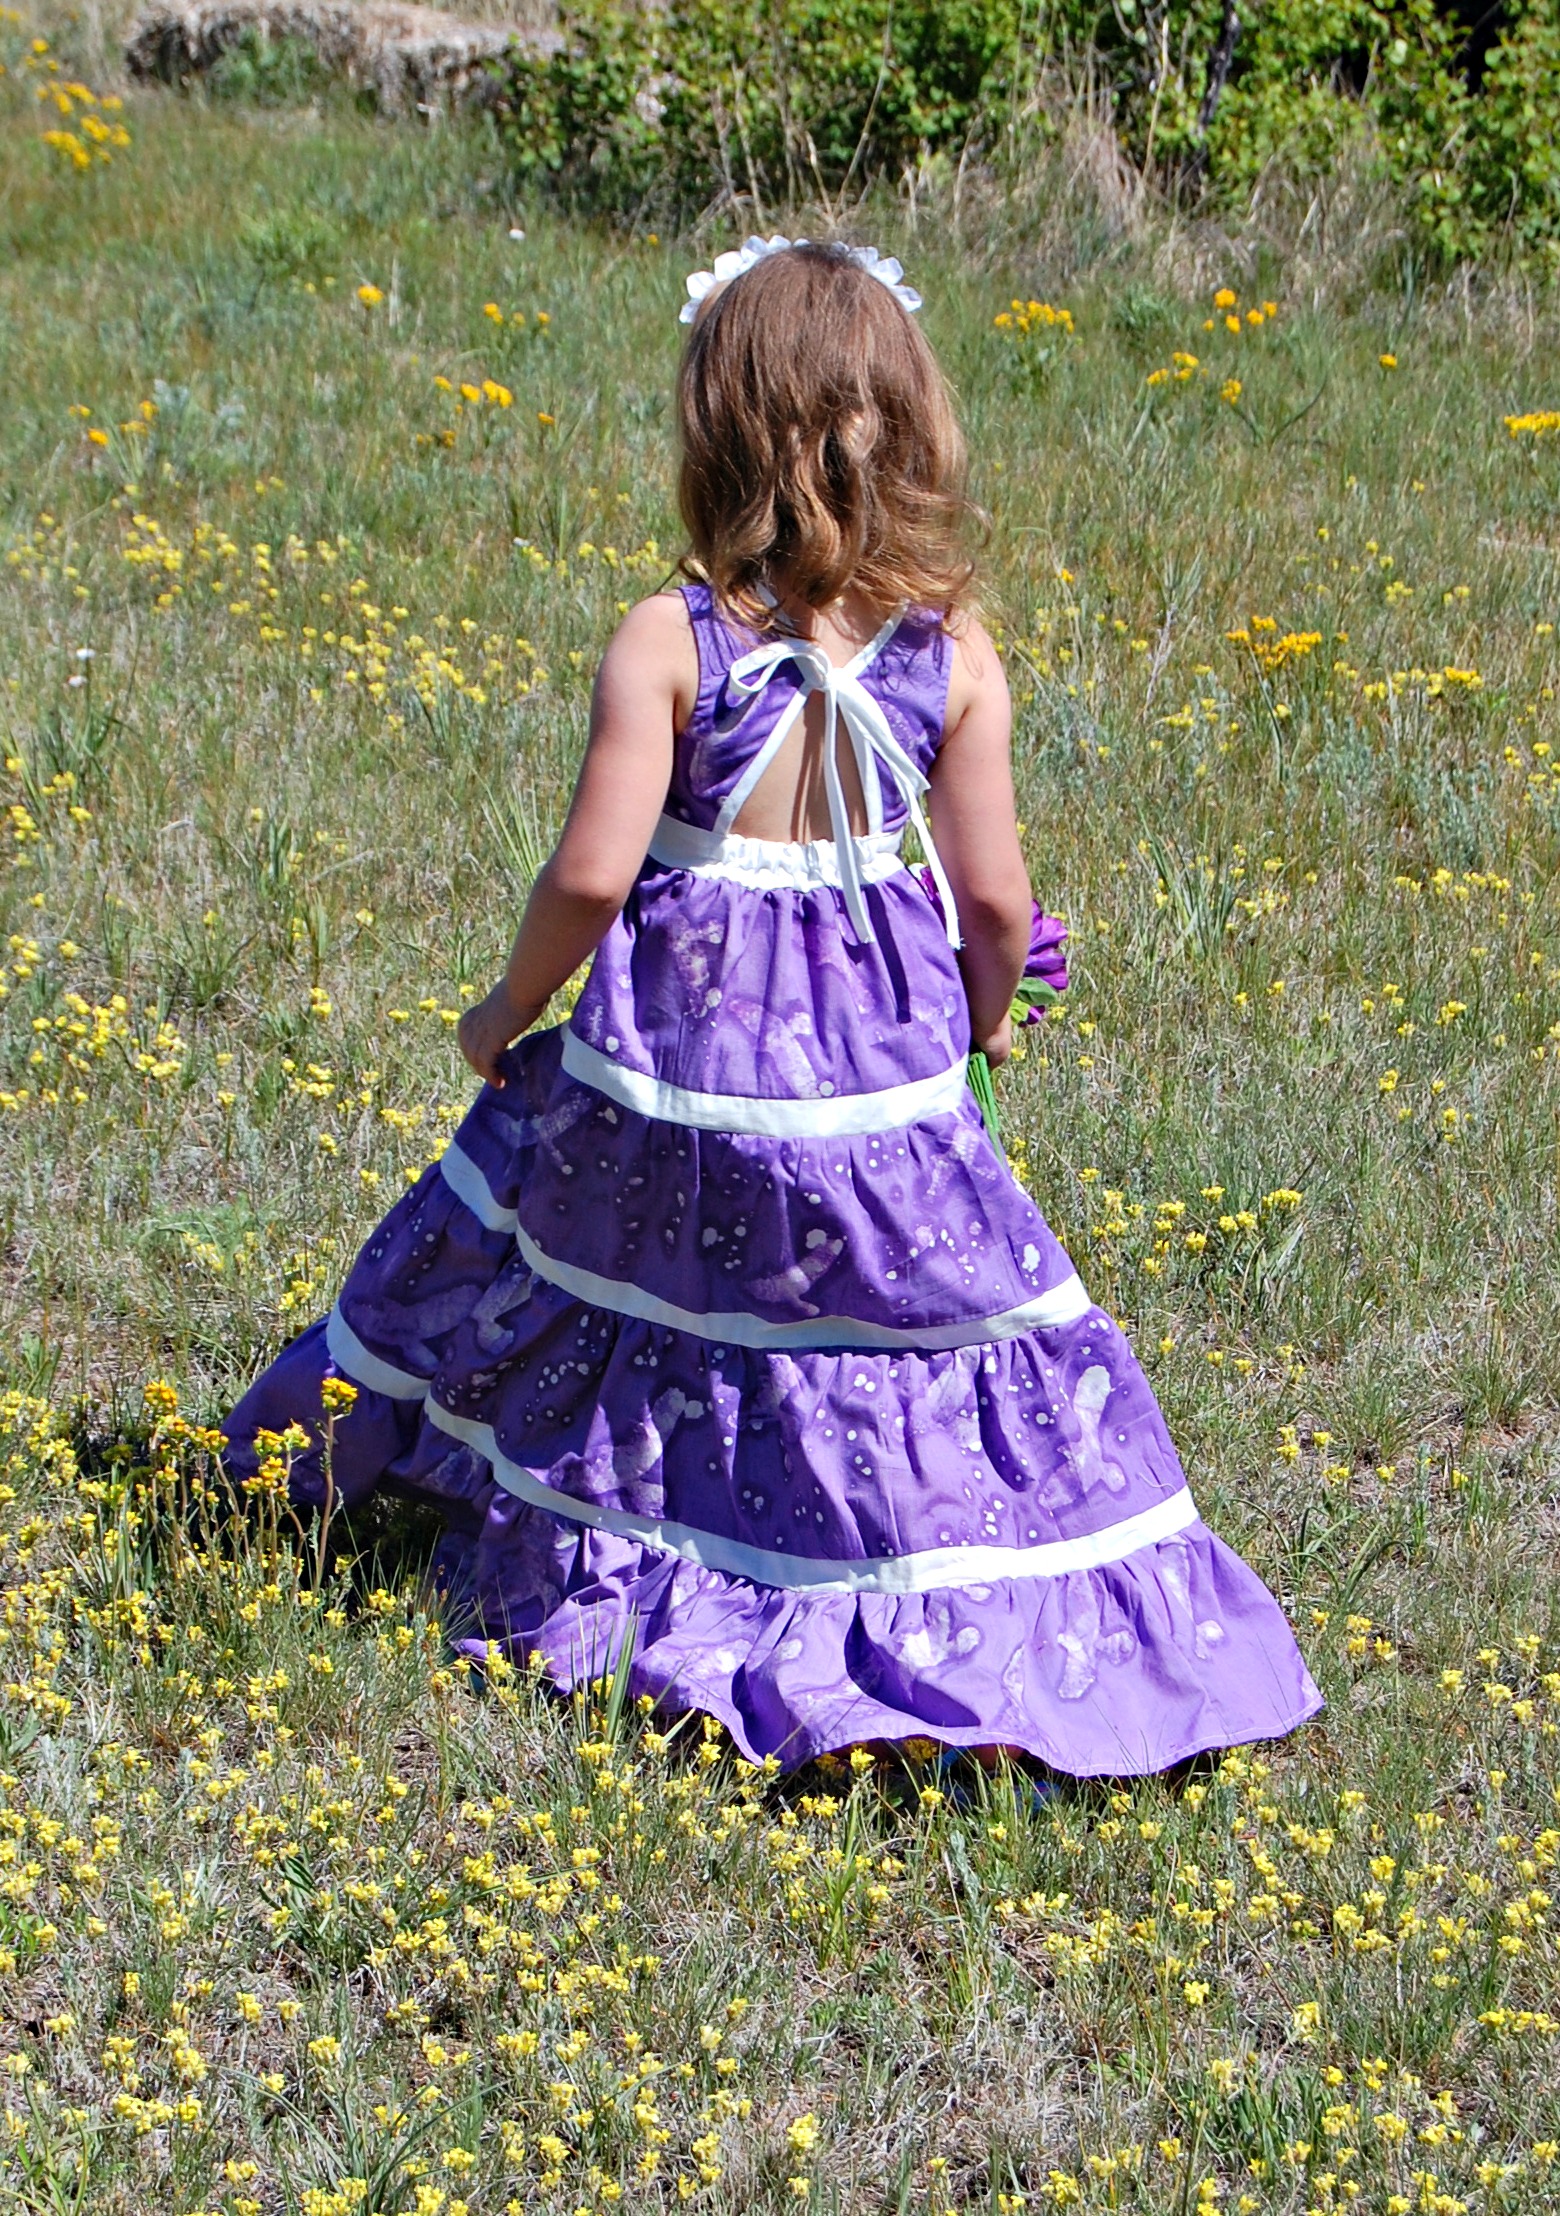
A couple months ago, I was asked to join a Mystery Challenge. Basically, a group of us crafty blogger ladies get together and exchange ideas for another to blog about. The theme of the challenge was “Moments and People Throughout History”, and I was given Madame Marie Tussaud. I scratched my head at first, thinking, ‘That name sounds so familiar’… and then it dawned on me, ‘She’s the wax museum lady!!!’ Madame Tussaud created wax figures in the late 1700’s, and her work is still on display today. Not to mention, the dozen or so branches of museums named in her honor.

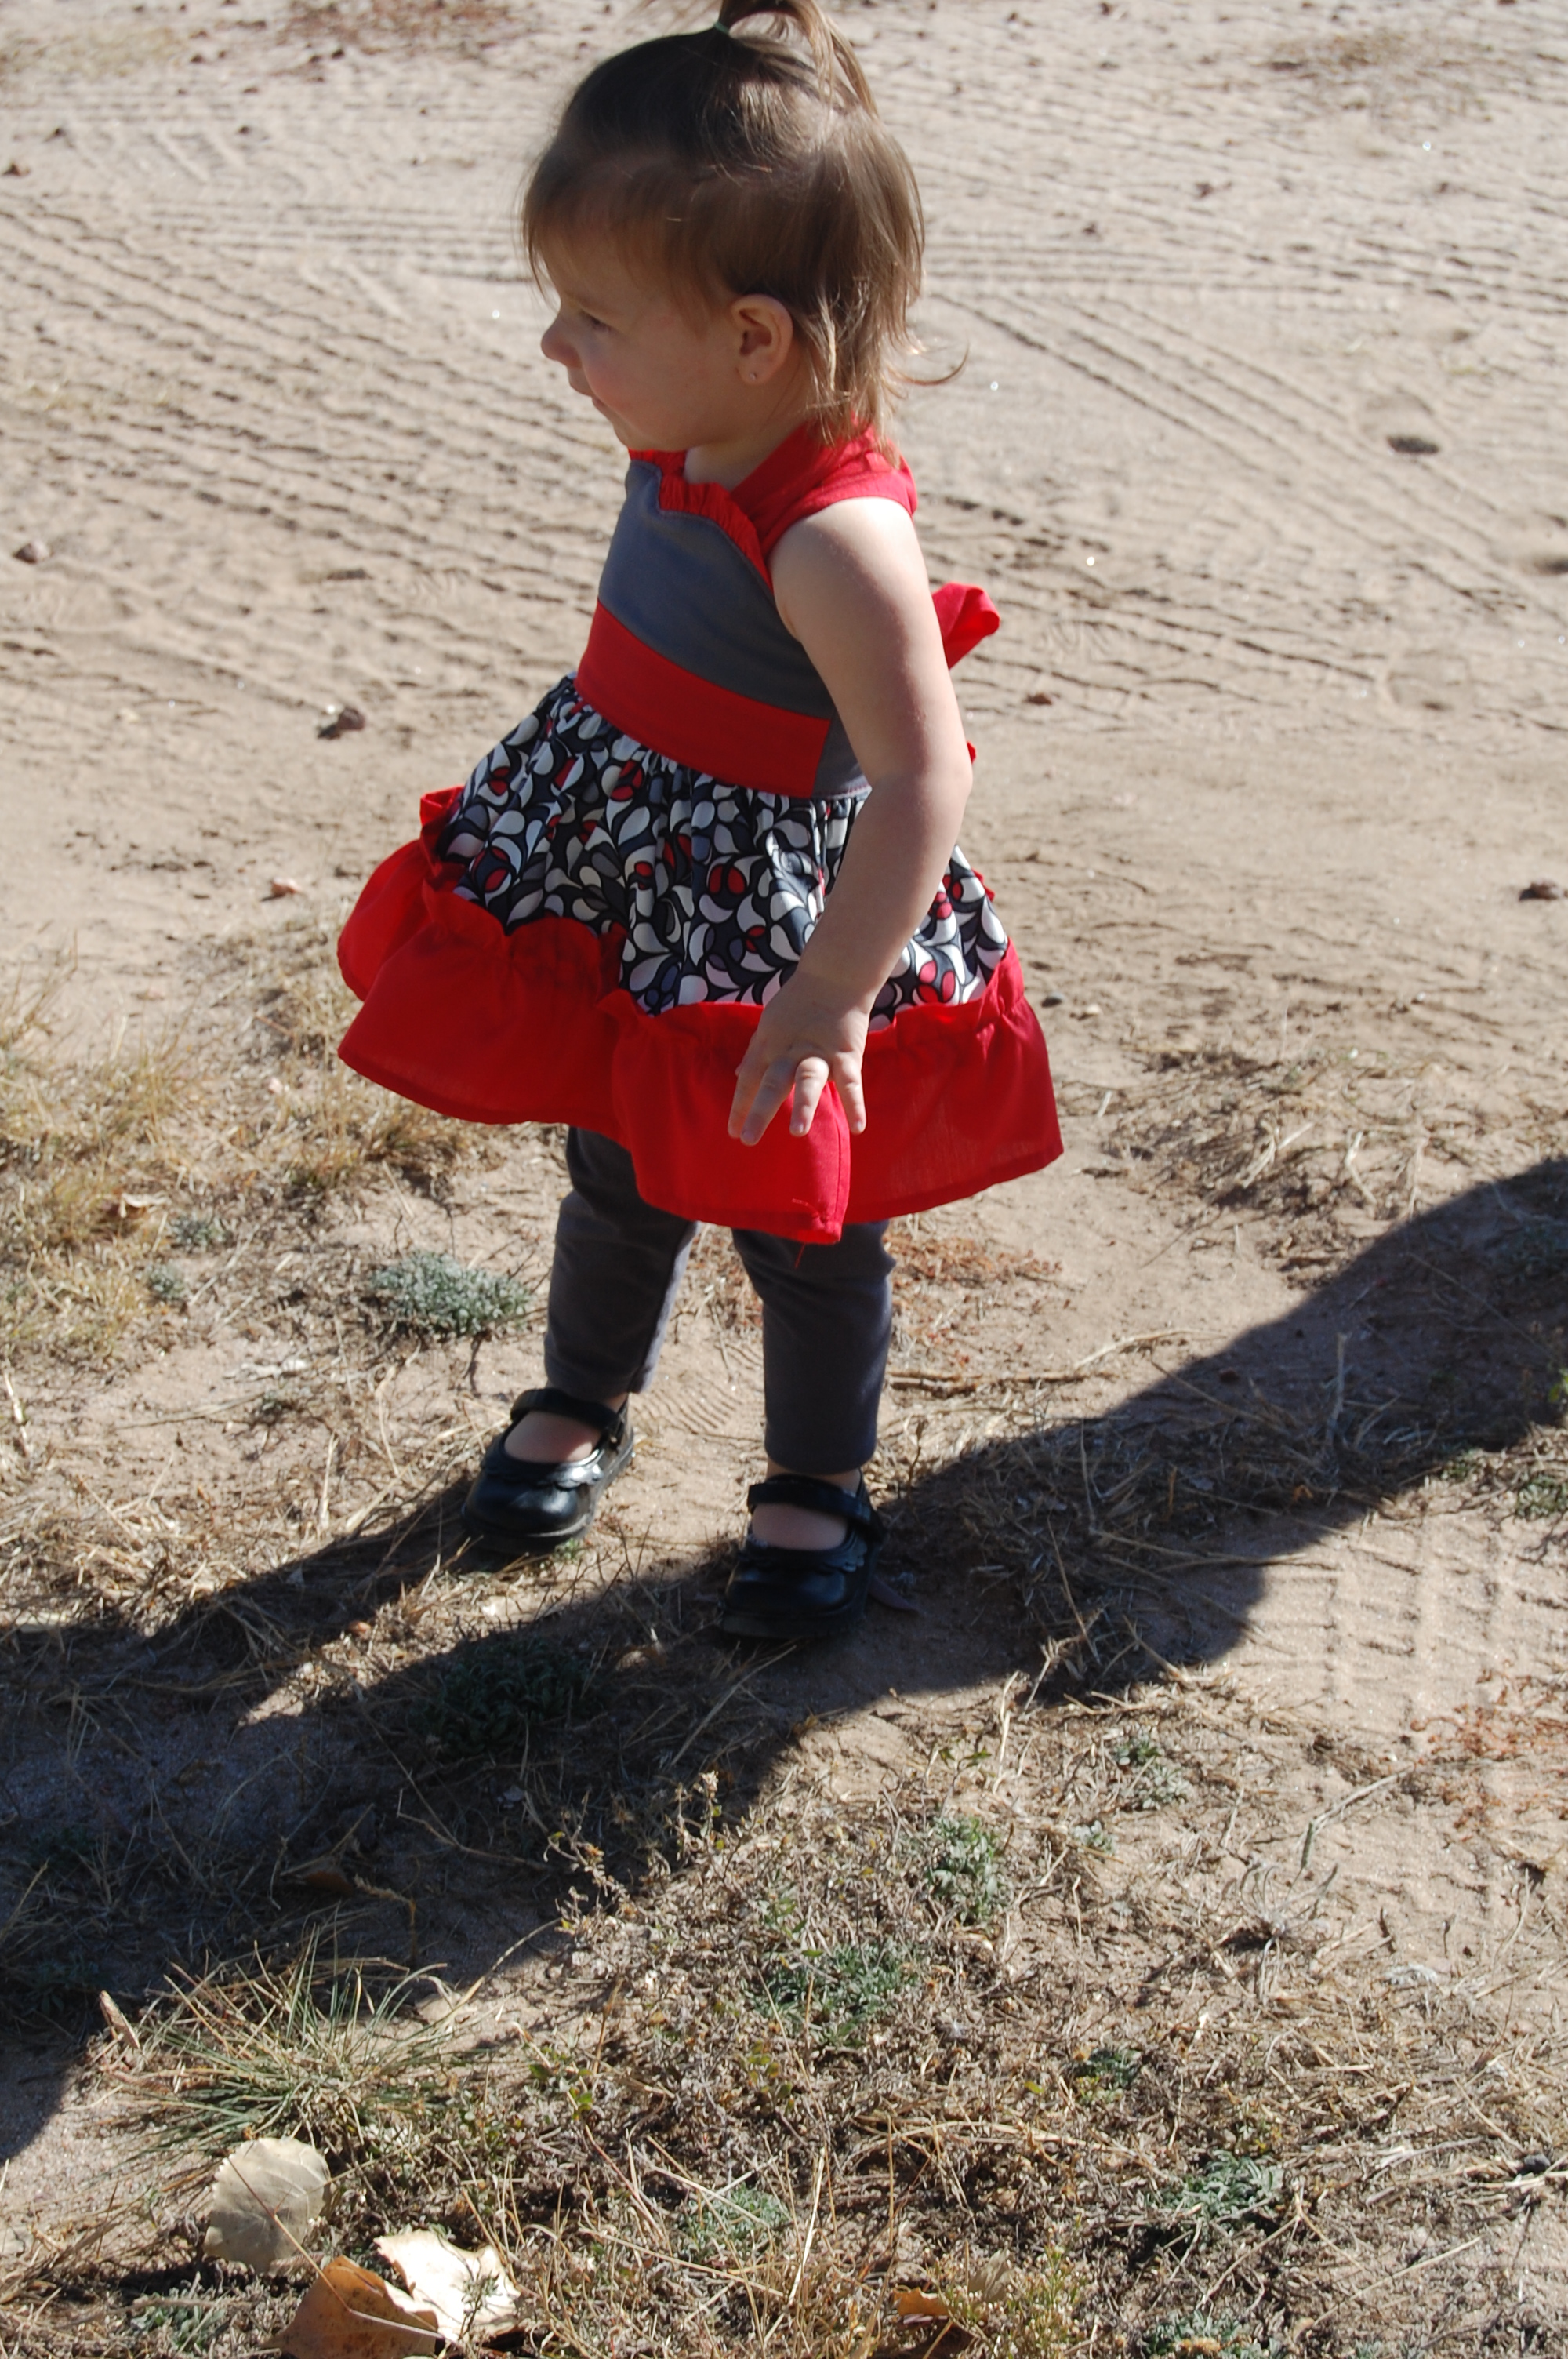
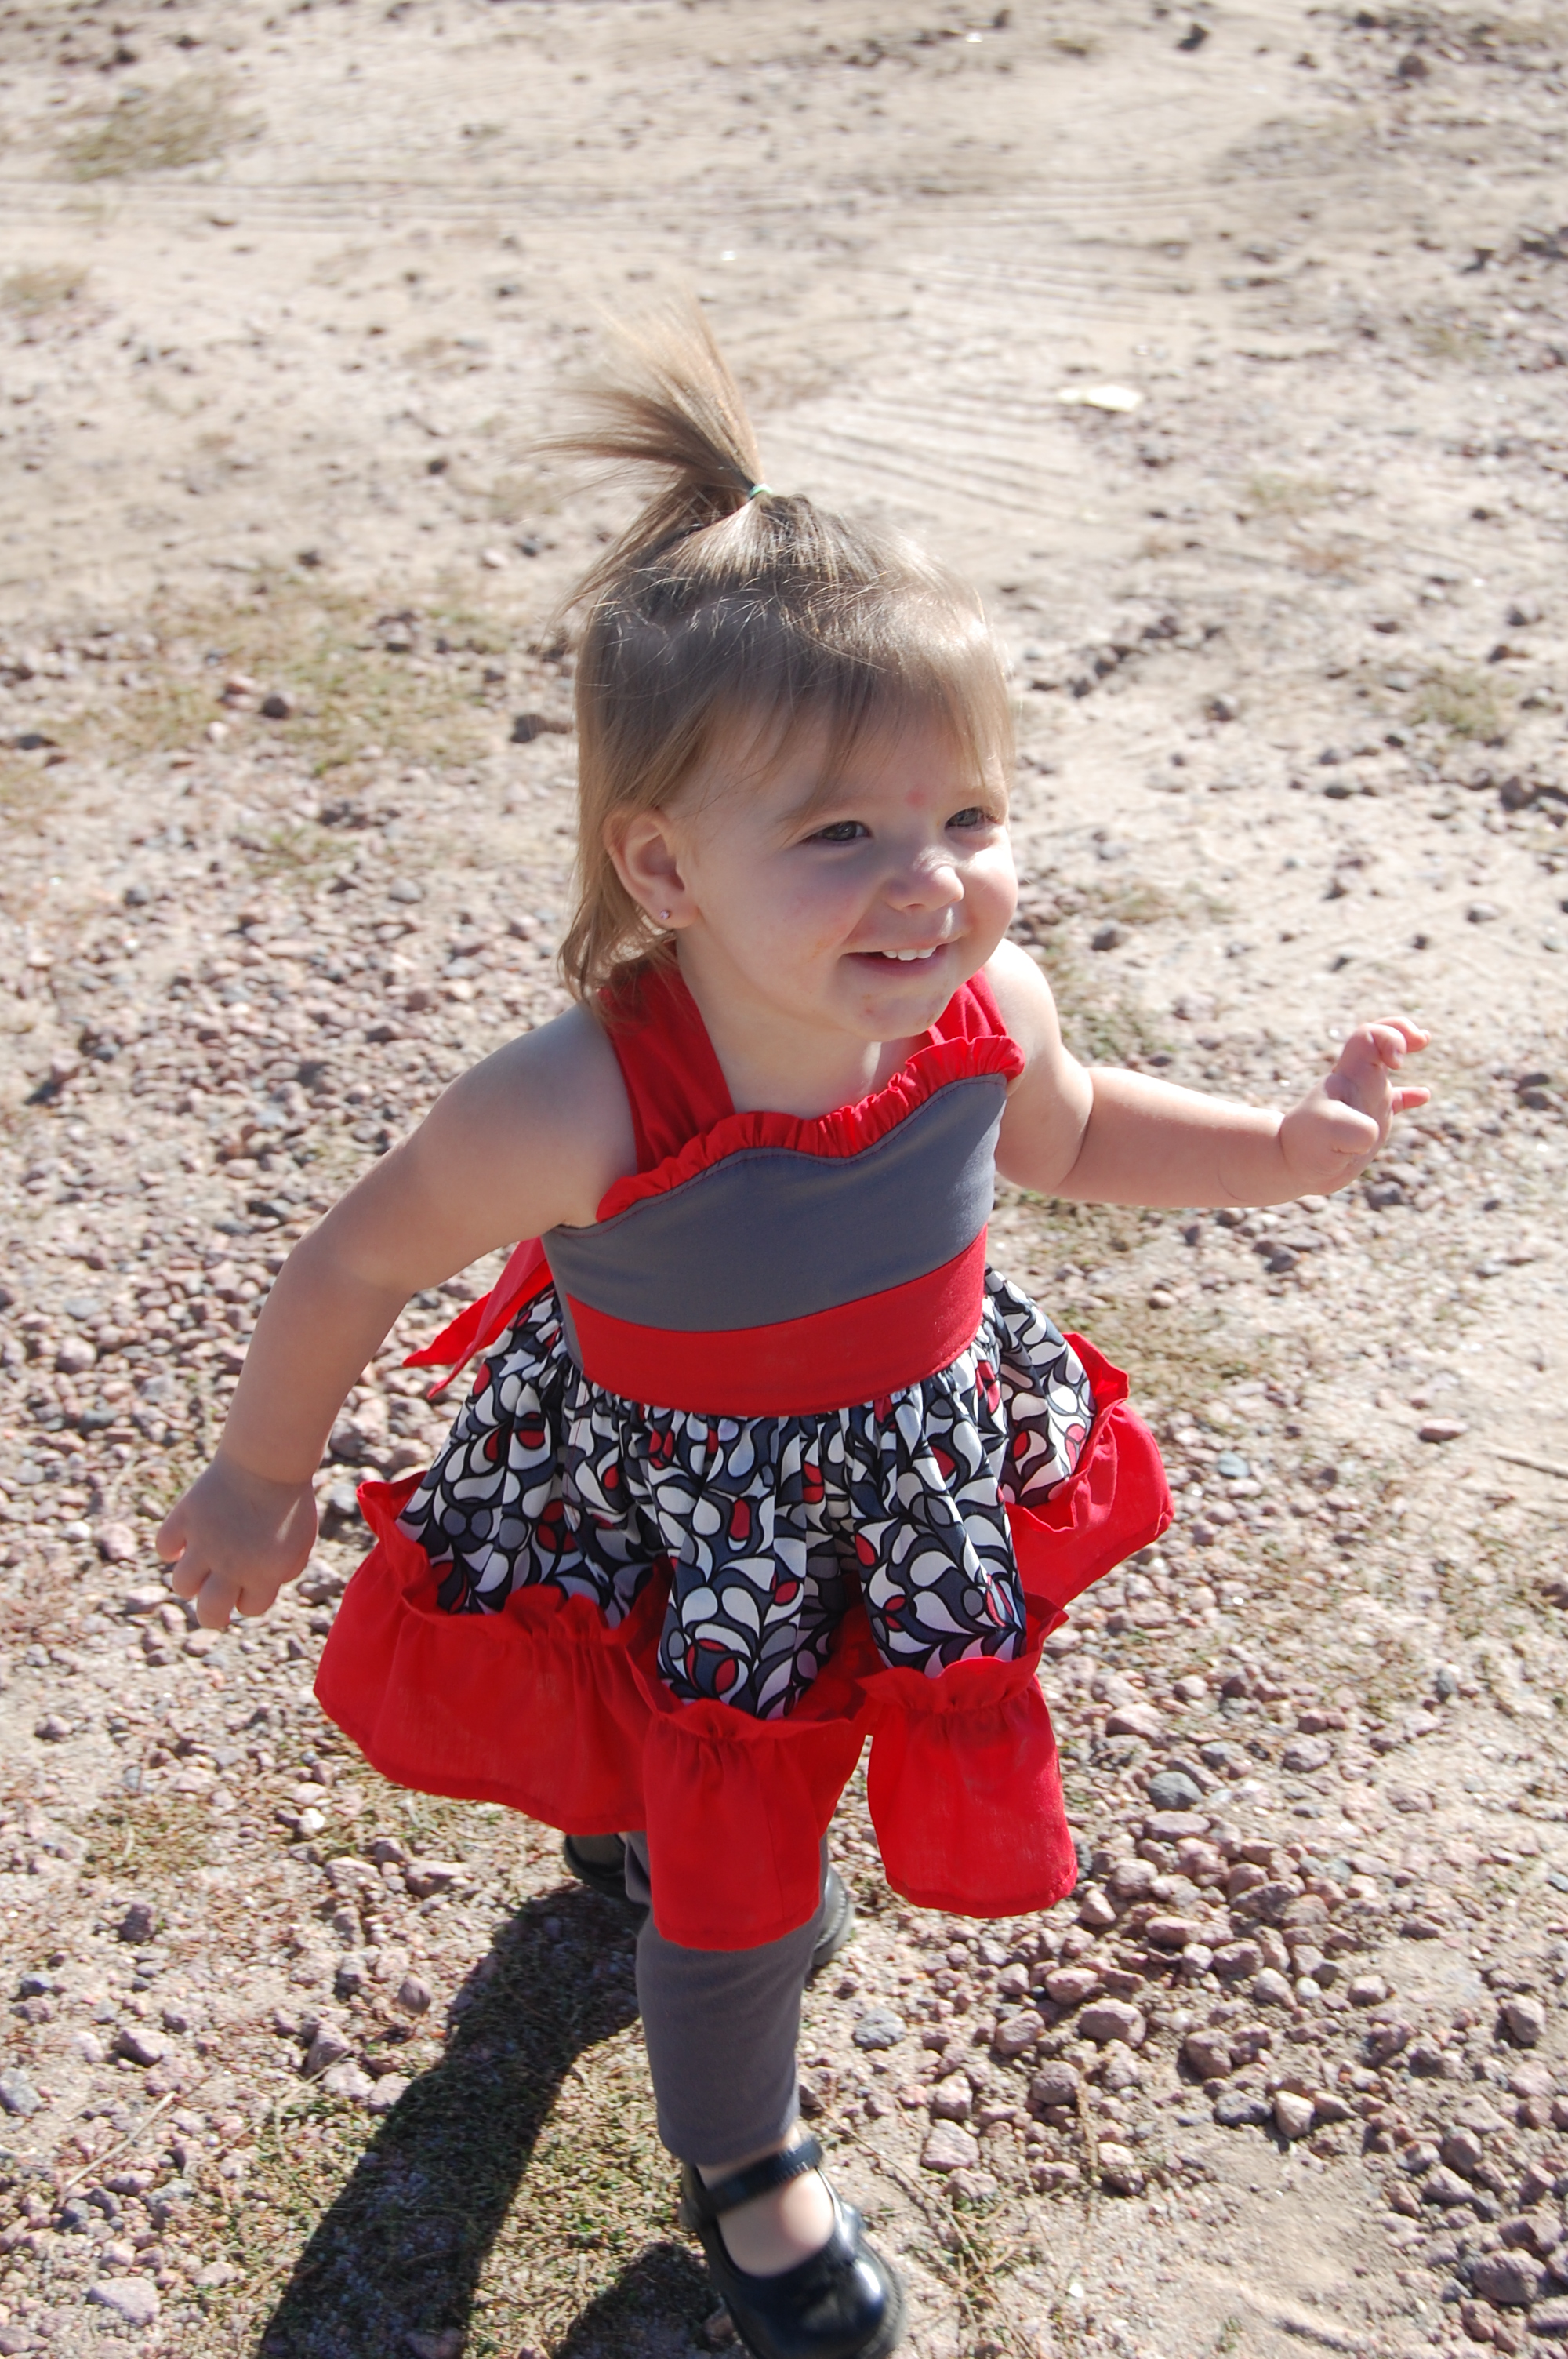
Now, I am definitely no sculptor. So, I had to find a way to pay homage to her work and history in my own artistic way. I’m a fabric girl, so I definitely knew I wanted to sew something, but how could I involve the wax? And then it hit me (with a little help from my husband),– Batik!! If you’re not familiar, batik is a fabric dyeing technique. You apply wax to the fabric, dye it, and then remove the wax; leaving that part of the fabric uncolored. So, I did my research and got to work. (And I worked and worked and worked…. practicing the technique over and again until I got just the results I was looking for)
To start, I had my husband make me these wooden stamps. If you haven’t checked out his custom woodwork, I HIGHLY recommend you go look!! Ravenwoodgrips (You have to love a shameless plug 😉 )

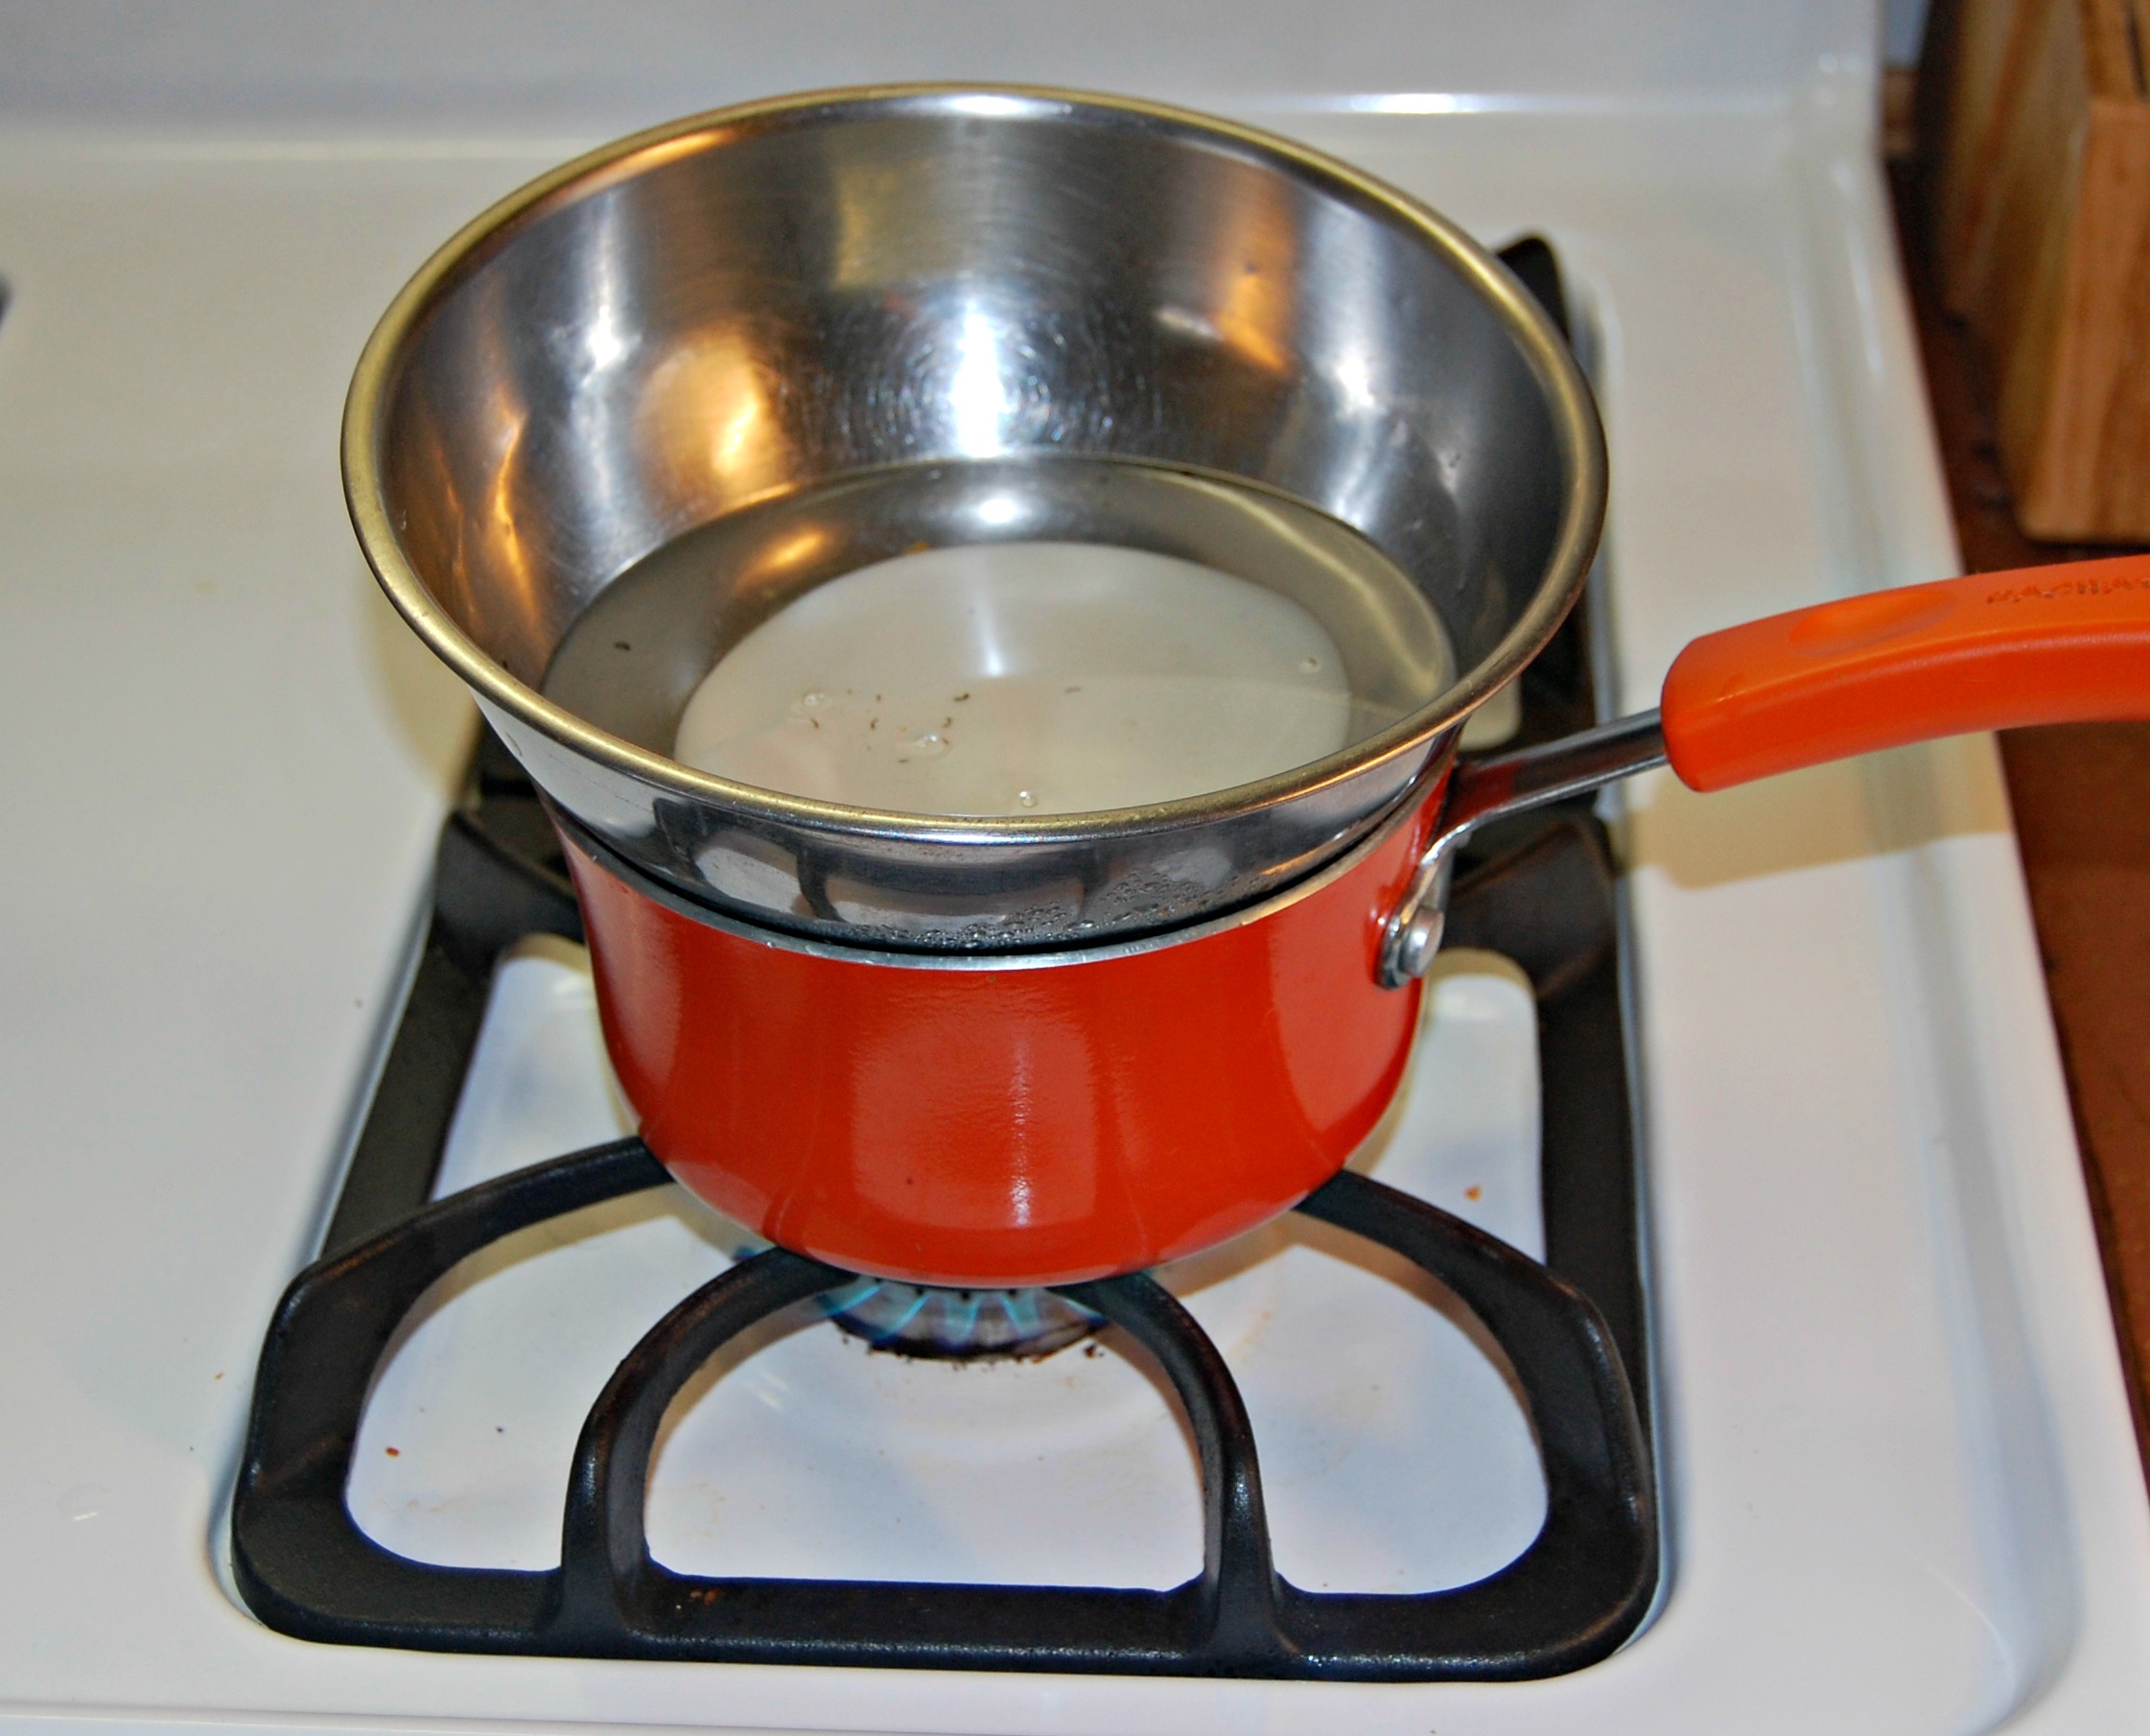
To melt the wax, I created a double broiler on the stove. I found that the hotter the wax got, the better results I got.

I simply dipped my stamp, and placed it where I wanted on the fabric. The wax dripped a little here and there, but I actually discovered that I really liked how my “mistakes” were looking. I ended up dripping wax all over the fabric on purpose, just to increase that look a bit.
***I pre-cut all of my pattern pieces to avoid having to stamp and dye a huge piece of fabric. It worked well, however, I didn’t fully think it through. For one thing, they shrunk just a bit in the hot dye. The other problem I ran into was that I couldn’t wash my pieces after I had dyed them without the edges fraying.

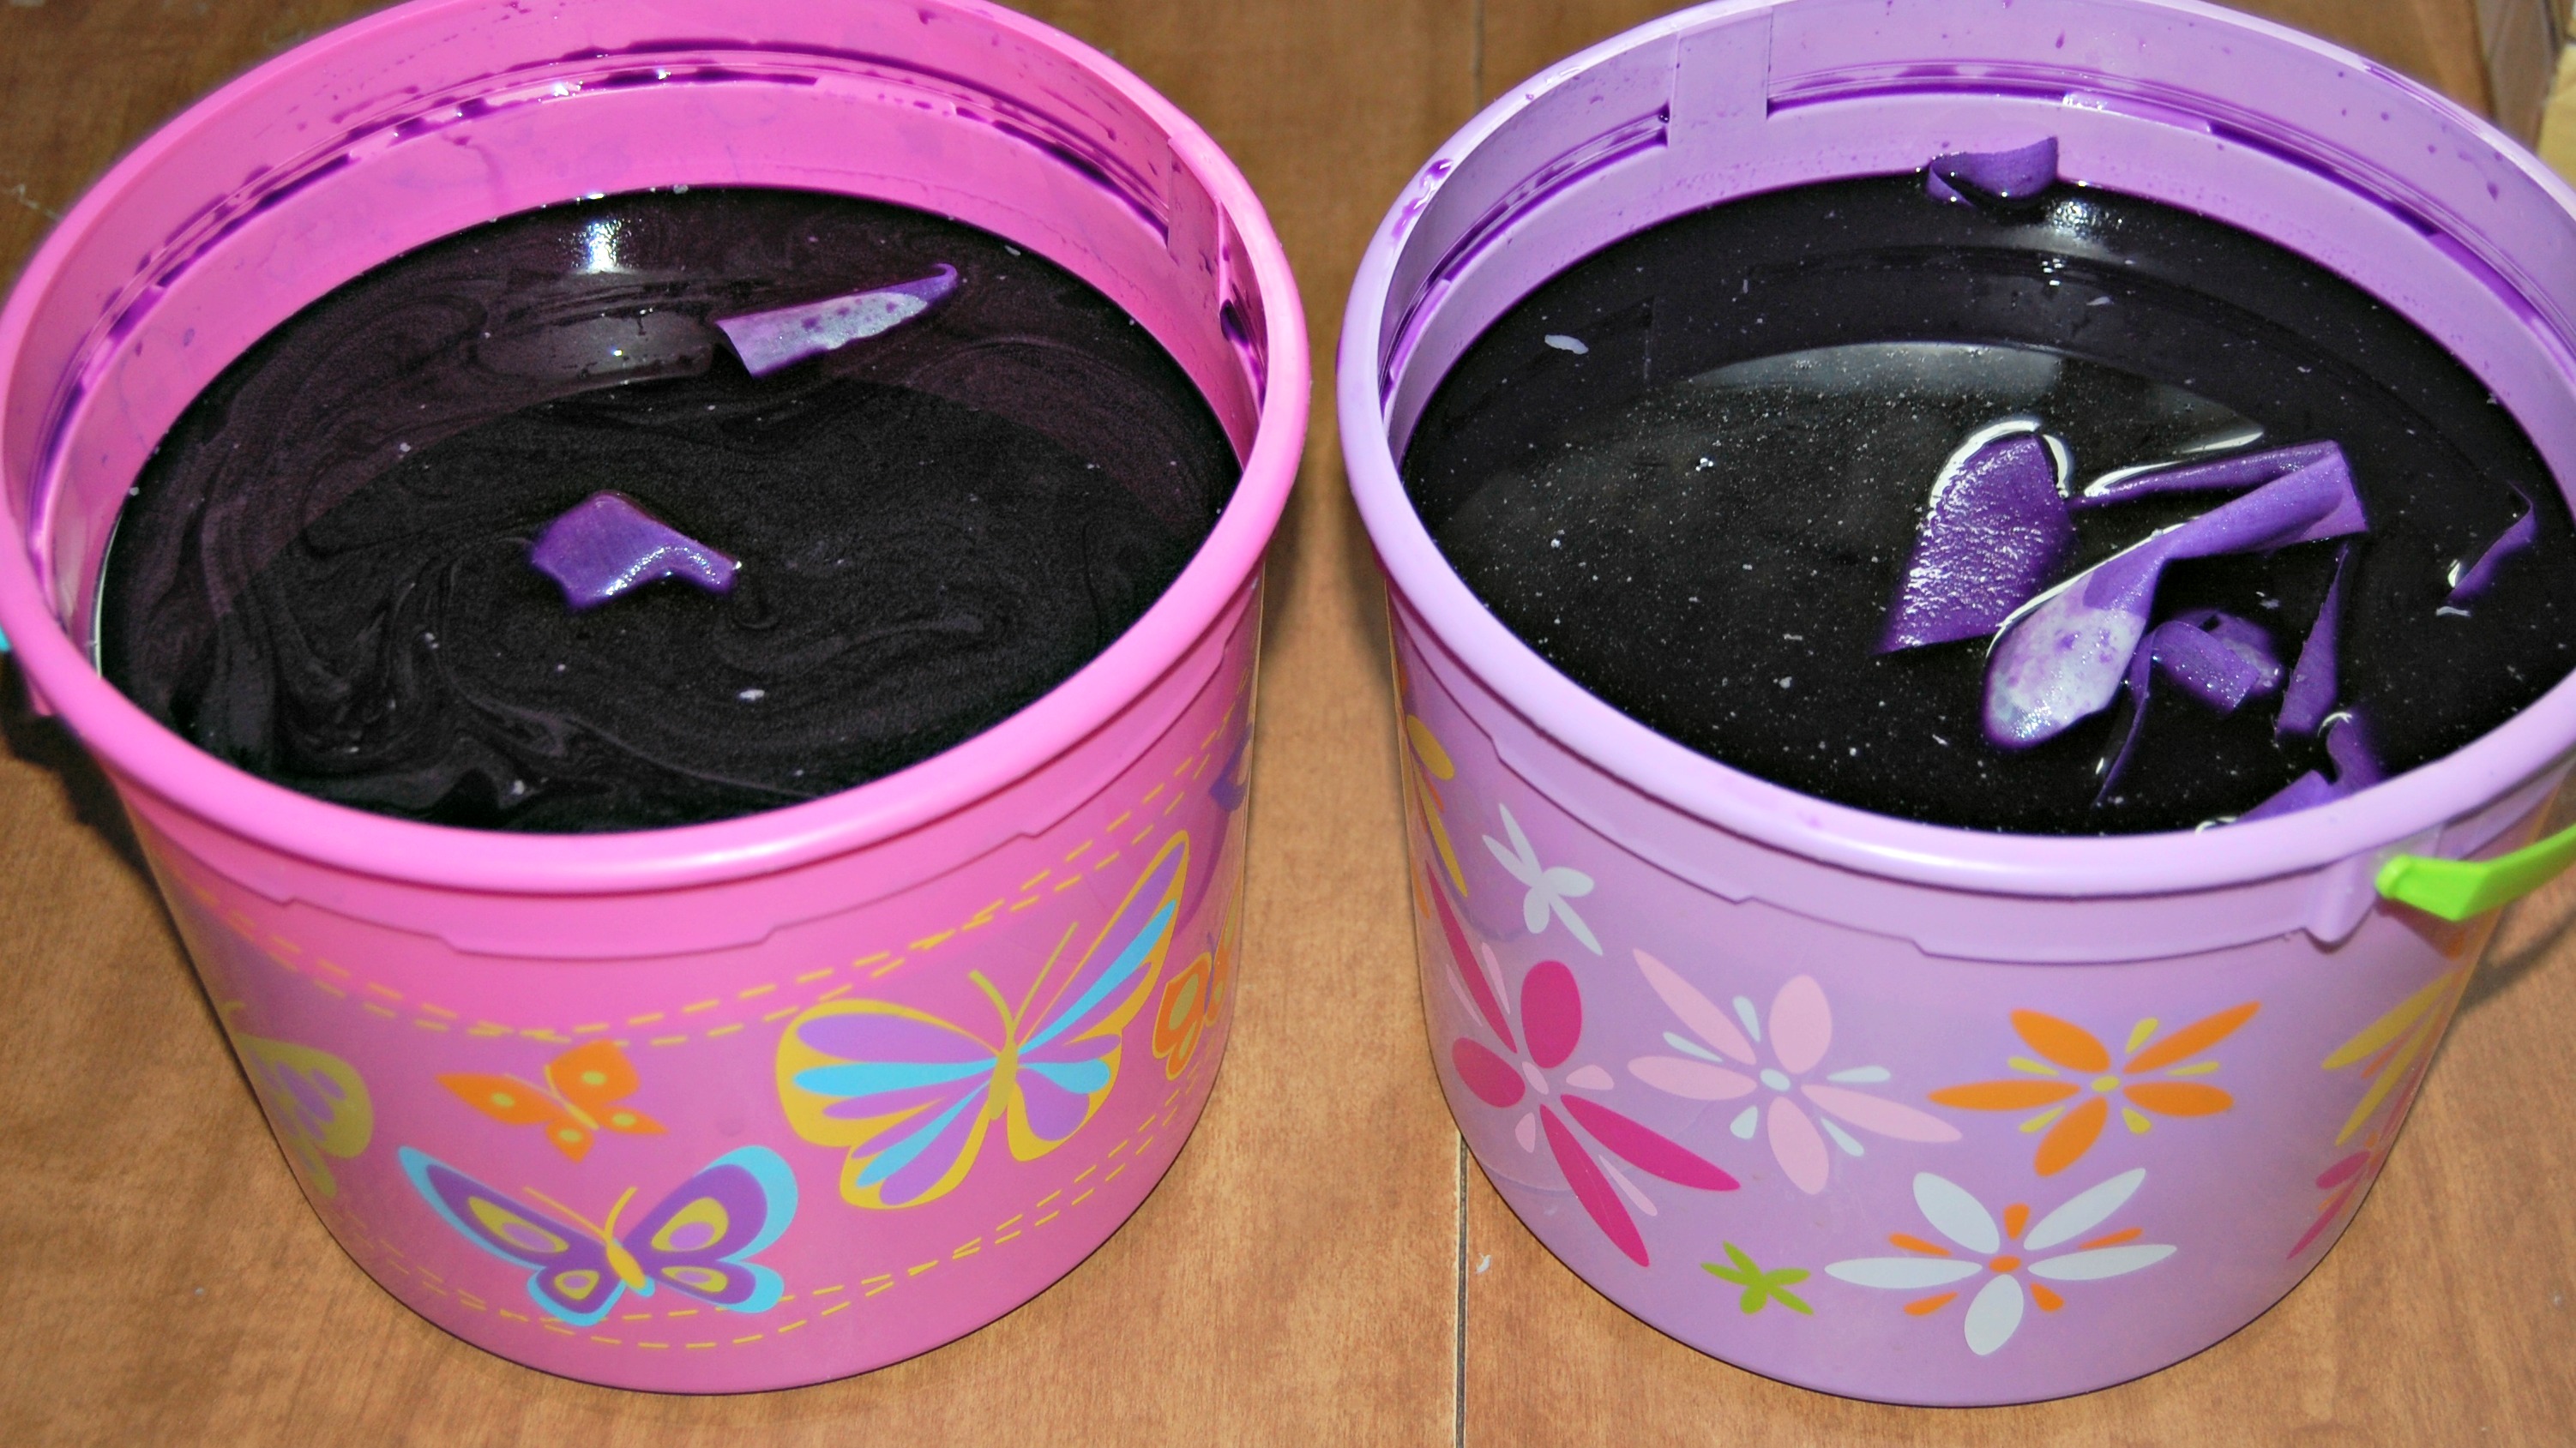
After everything was stamped and the wax dried, I placed it all in purple dye! (The girls old Easter buckets came in handy for this part!
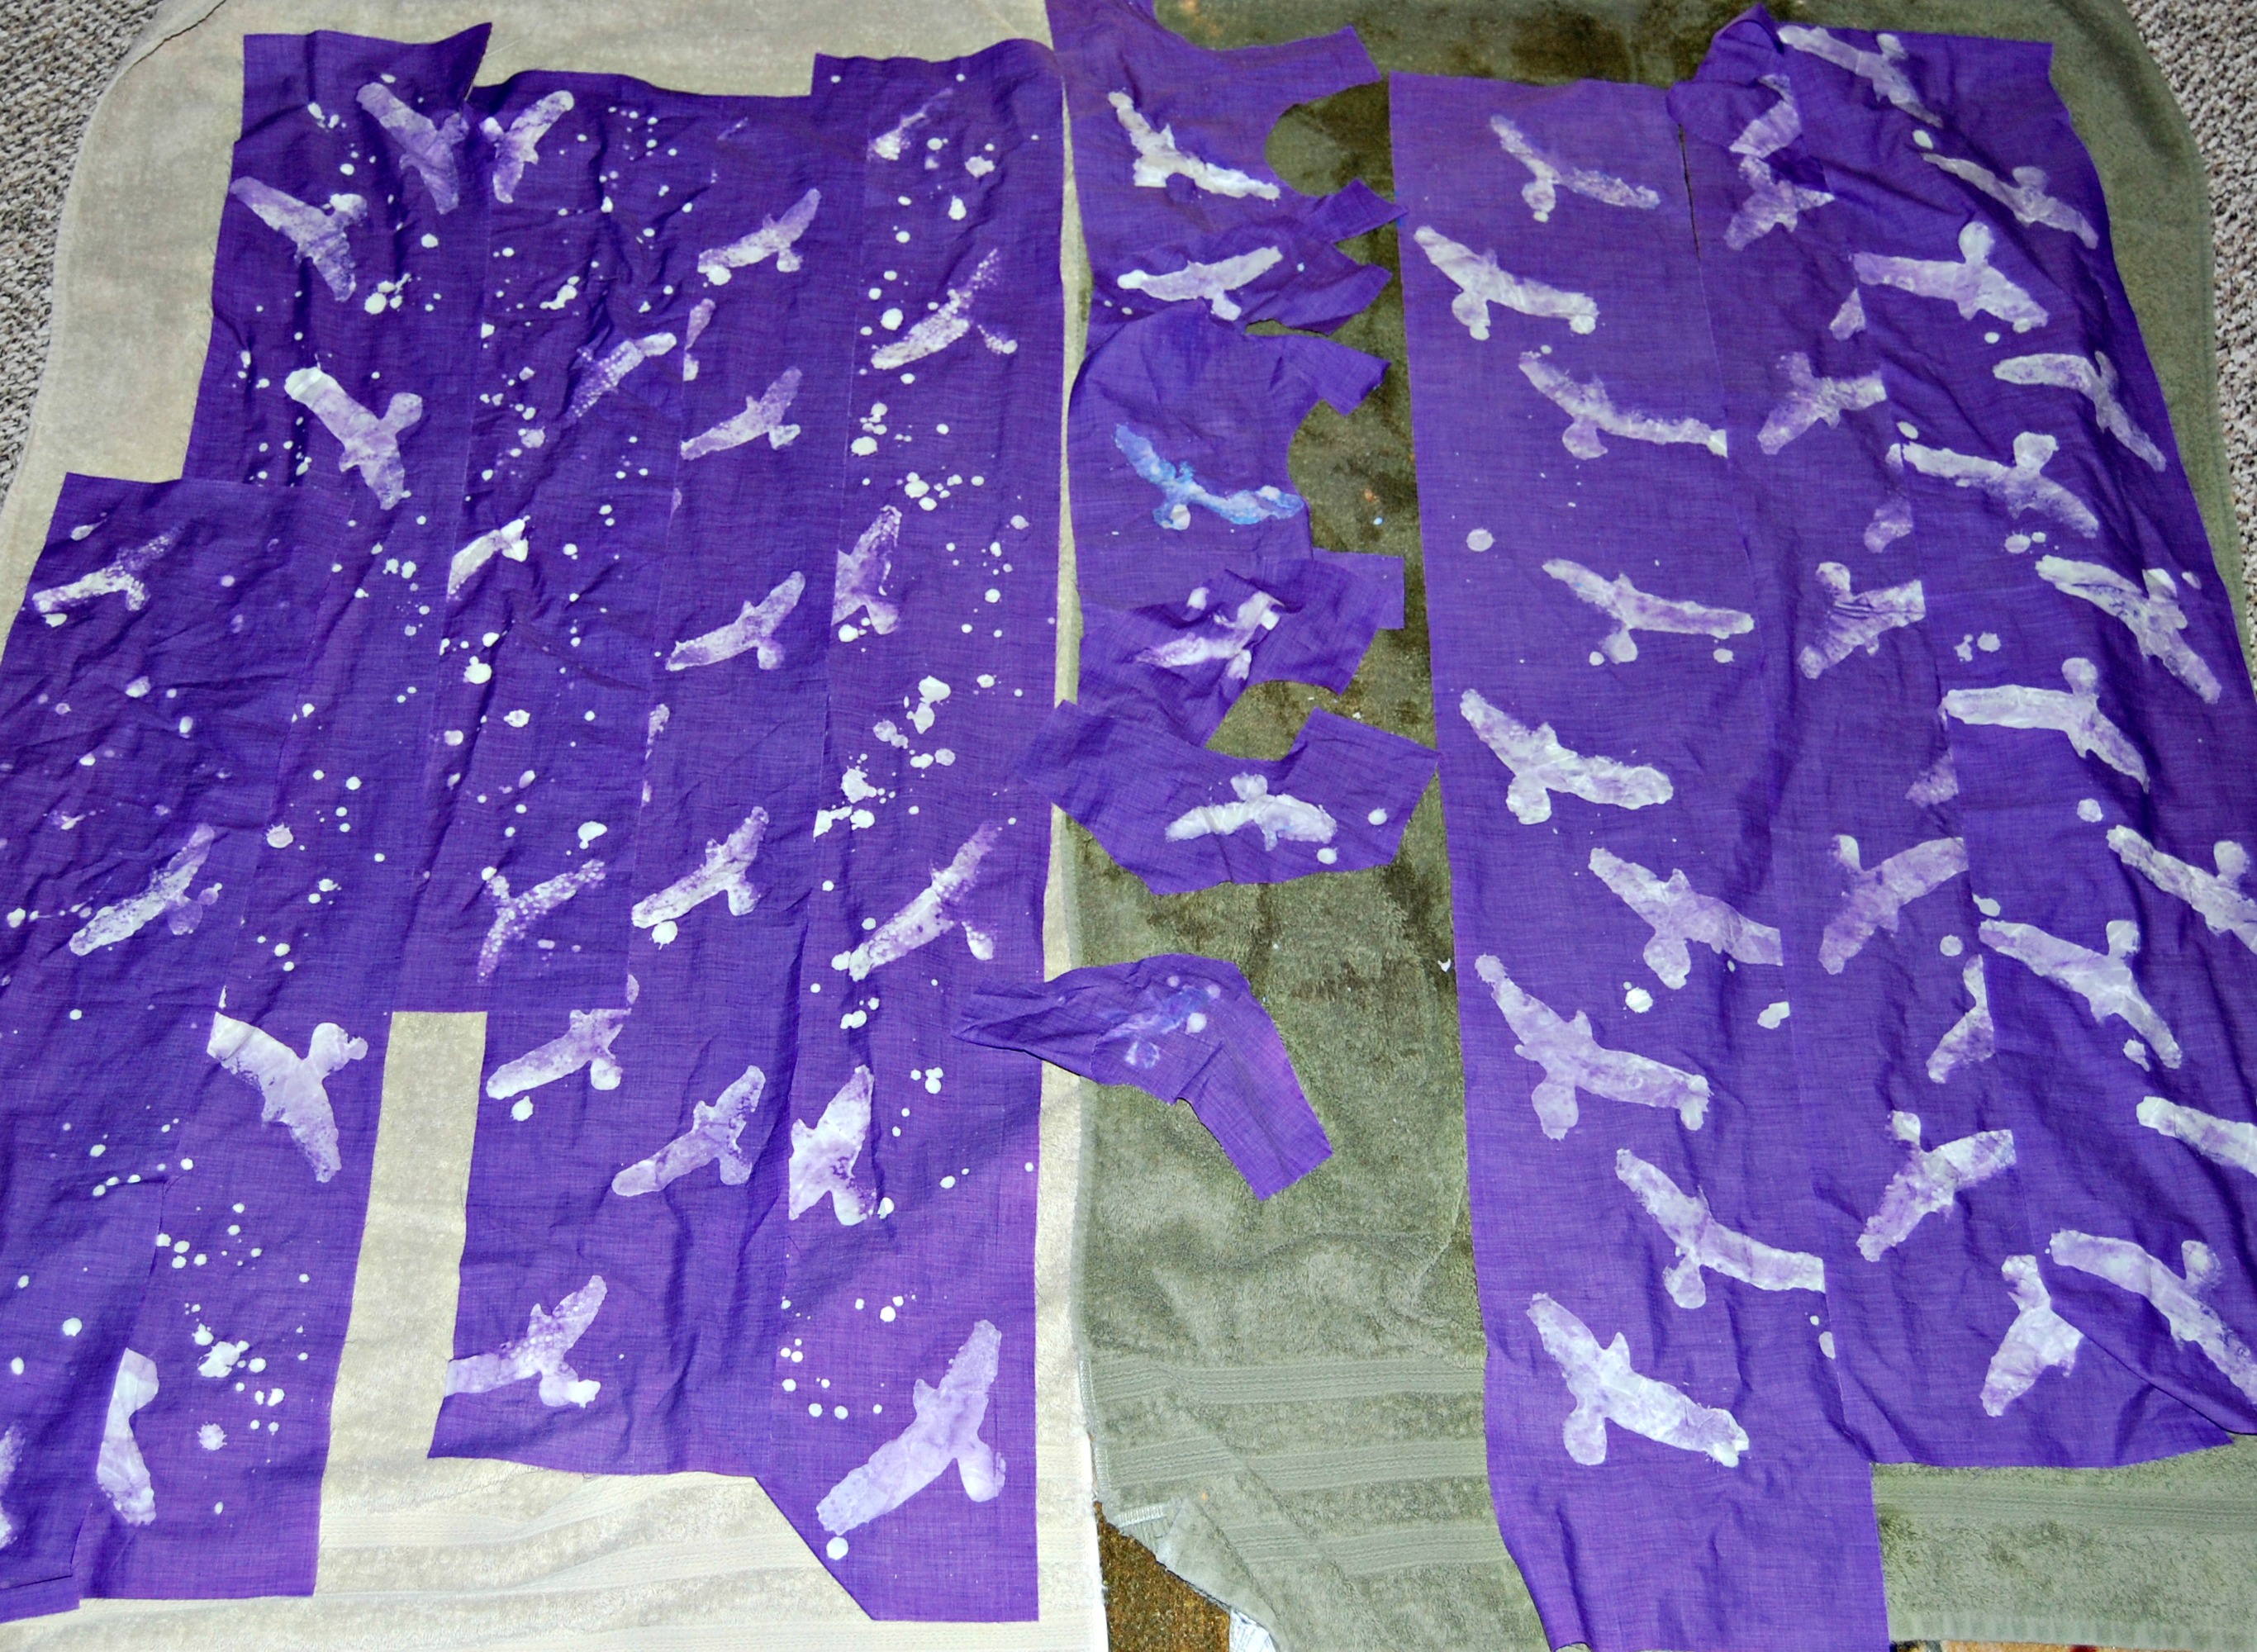
And here we have my pieces drying after the dyeing was completed. We had days and days and days of rain here in Colorado, so I was unable to hang them outside. I improvised and laid them out on some towels– hey, gotta do what you gotta do!
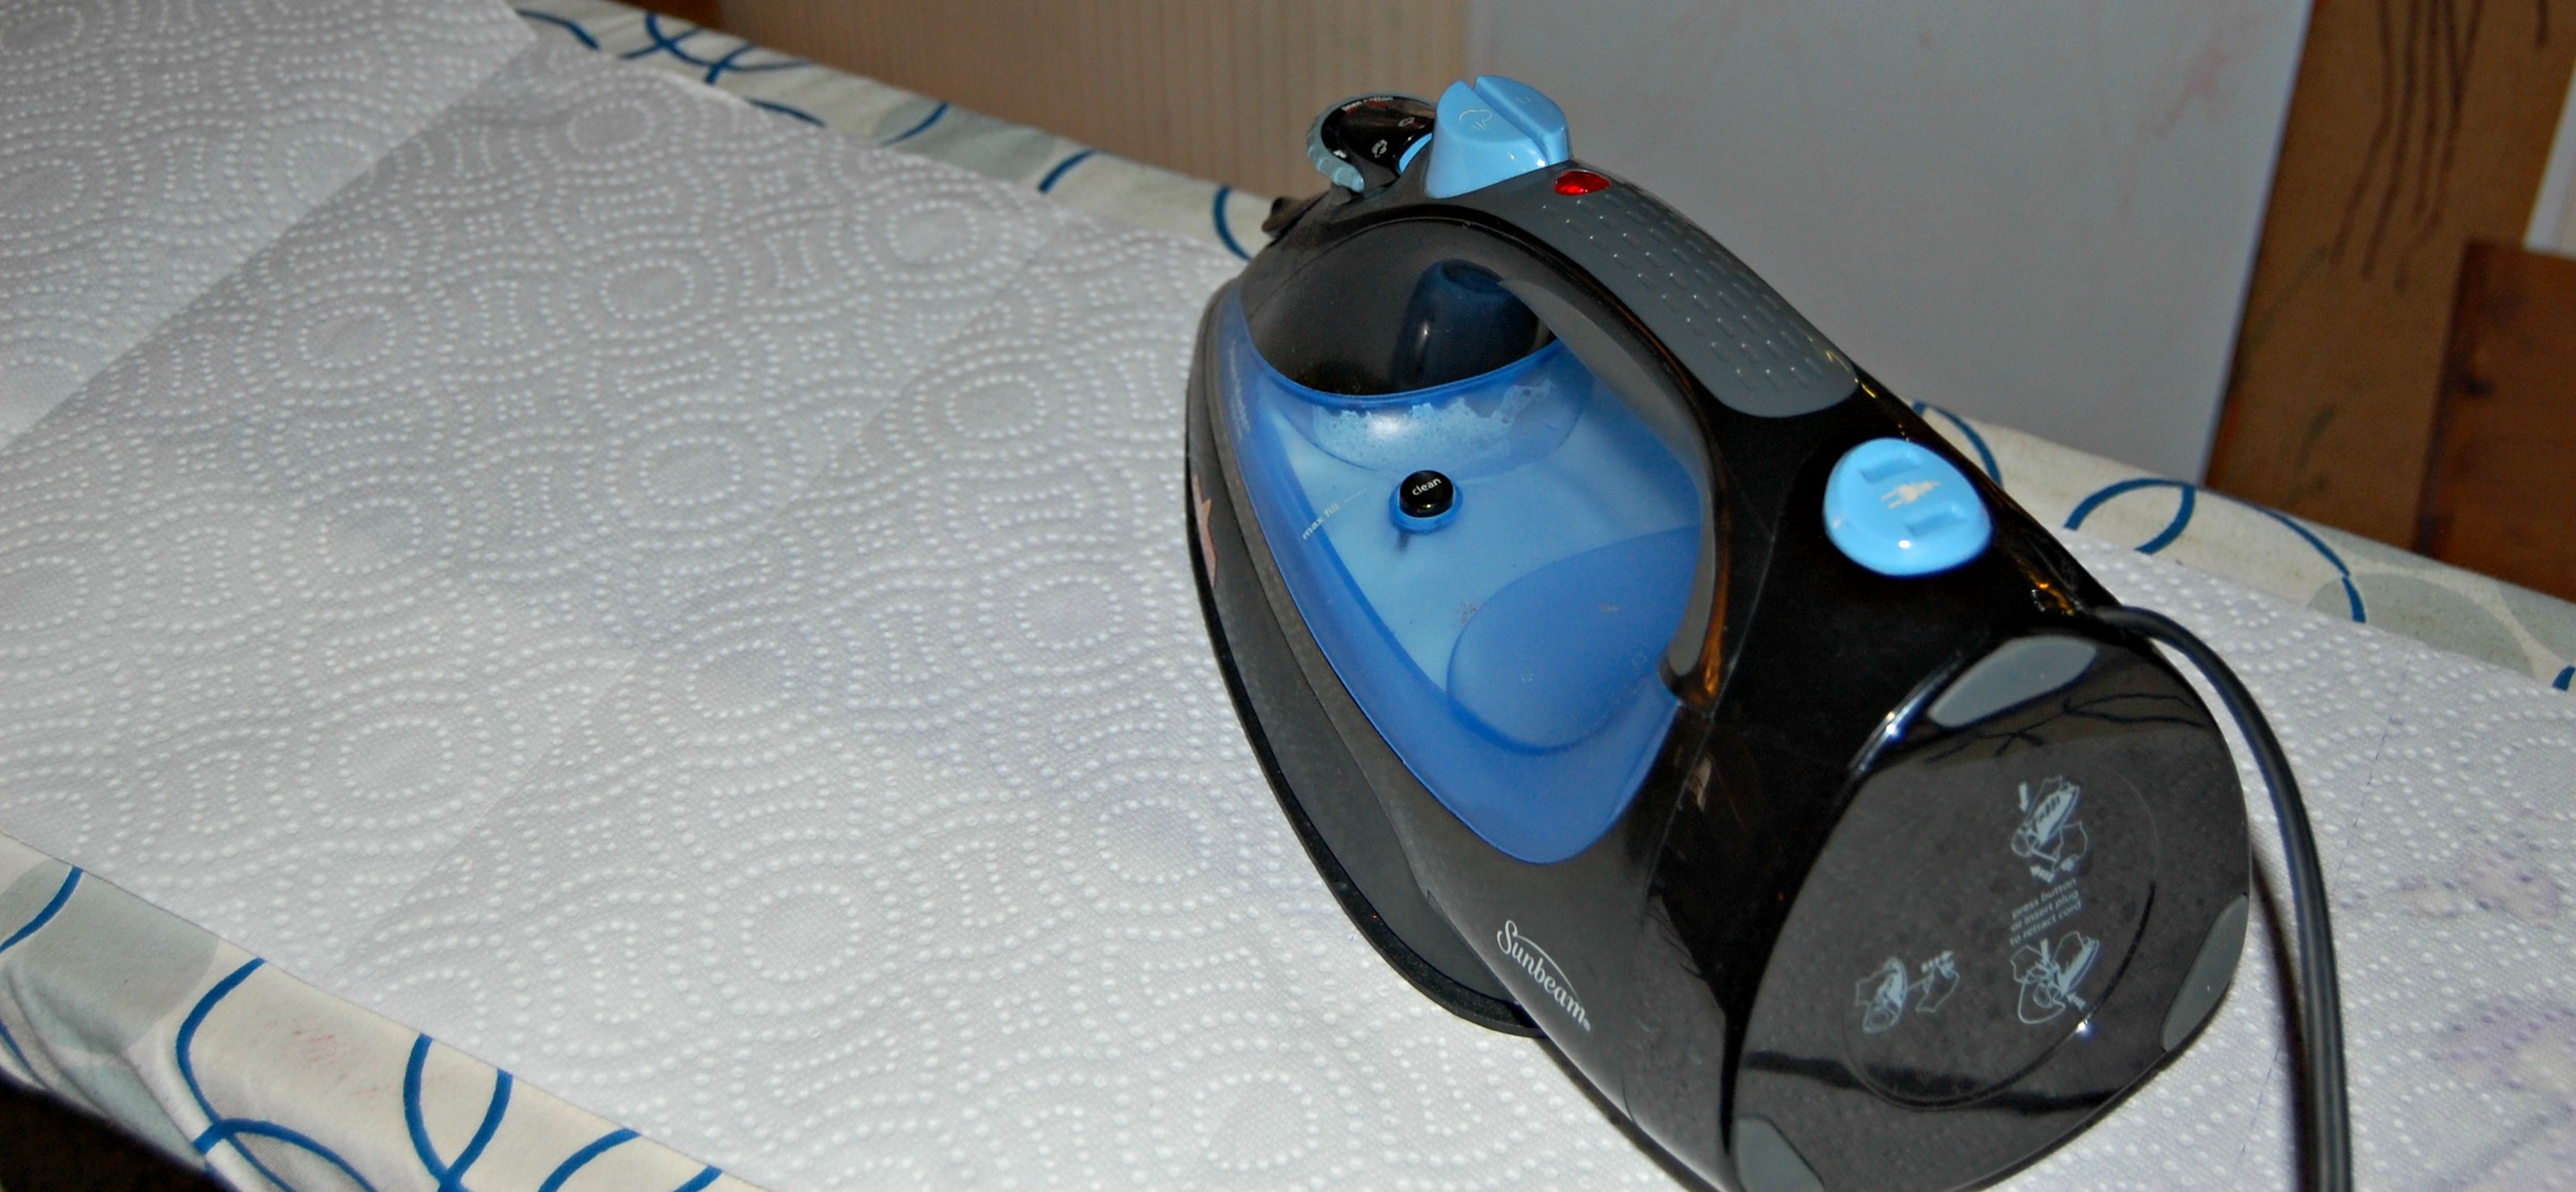
Then came the tricky task of getting the wax OFF the fabric. First, I scraped as much of the wax off as I could (gently) with a plastic kitchen spatula. Then, I lined my ironing board with paper towels, laid the fabric on top, then covered that with more paper towels. I turned my iron on high heat, and ironed right on top of the paper towels. As the wax melted, the towels soaked it right up!

All that was left to do is sew! I used the new Mia pattern from Simple Life Pattern Co. Linnaea wanted a long dress that would make her feel like a princess, and this one fit the bill! (And it’s yet another pattern with OPTIONS! Go check it out!)
Now all that’s left to do is bombard you with pictures of my princess. I couldn’t pick just a few, so I’ll share a bunch…


I had so much fun with this challenge! I am already looking forward to joining the next one!
Follow along on the Mystery Challenge Tour, and read the other blog posts here—
5/25│ The Berry Bunch – Frank Lloyd Wright │ Sew Not Perfect – Lucille Ball, I Love Lucy
5/26│ Friends Stitched Together – Prohibition/Roaring 20’s │ HaCunha Matata – Jane Austin
5/27│ Zoe and Ted – Suffragetes
5/28│ House of Estrella – Woodstock/Fall of the Berlin Wall │ Pen Seb Rox – Piet Mondriaan
5/29│ Friends Stitched Together – Impressionist Movement │ Wining Wife – Judgement of Paris
5/30│ Super Stay at Home Mommy – Madame Tussaud │ Keep Calm and Carrion – Jackie Kennedy │ Gloria June – Florence Nightingale
5/31│ Sofilantjes – Andy Warhol │ Busy Little Bee – Marie Antoinette │ Amanda Rose –March 9, 1959 Barbie
6/1│ Pienkel – Bianca Jagger │ Huisje Boompje Boefjes – Anne Frank
6/2│ Taking it Up a Notch – Queen Victoria │ Amazing Adventures with Bubba and Bug –1964 New York World Fair │ Kelly’s Sewing Creations – Steampunk Mary Queen of Scots
6/3│ Mae & K – Tesla │ Pretty Little Blog – Moon Landing │ Knot Sew Normal – Lutie Eugenia Sterns
6/4│ Sew Starly – Coronation of Queen Elizabeth II │ Hibbadoray – Amelia Earhart │ Sew Far North – Countess Markievicz (1868-1927)
6/5│ Made By Sara – John Dillinger/Roaring 20’s │ Create 3.5 – George Sand
6/6│ Country Bella – 1900’s World’s Fair/Art Nouveau │ Lulu and Celeste – Rosie the Riveter
6/7│Sew Domesticated – 1960’s/Civil Rights Movement │ Rebel and Malice – French Revolution/Joan of Arch │ The Fabric Hoarder – Gypsies
SLPco Ayda and Breanna Patterns!
I, once again, had that amazing opportunity to pattern test for Simple Life Pattern Co! She’s releasing not just one, but 2 super cute patterns today! And this is your chance to get them on sale, too! They’re 25% off until this Sunday (the 5th) at midnight!
Ayda’s top/dress is simply gorgeous! It features a V-back and circle skirt/gathered skirt options. There’s also an option for flutter sleeves, a modest back, and lace back.

Katie even walks you through the steps to make a lace back version (which is knock you out, BEAUTIFUL!) These instructions are a bit more advanced, but she takes you step by step in detail on how to accomplish this look.


We all know how much a girl loves to twirl, and you can’t beat the twirls you get from a circle skirt. Linnaea is beyond IN LOVE with this dress.
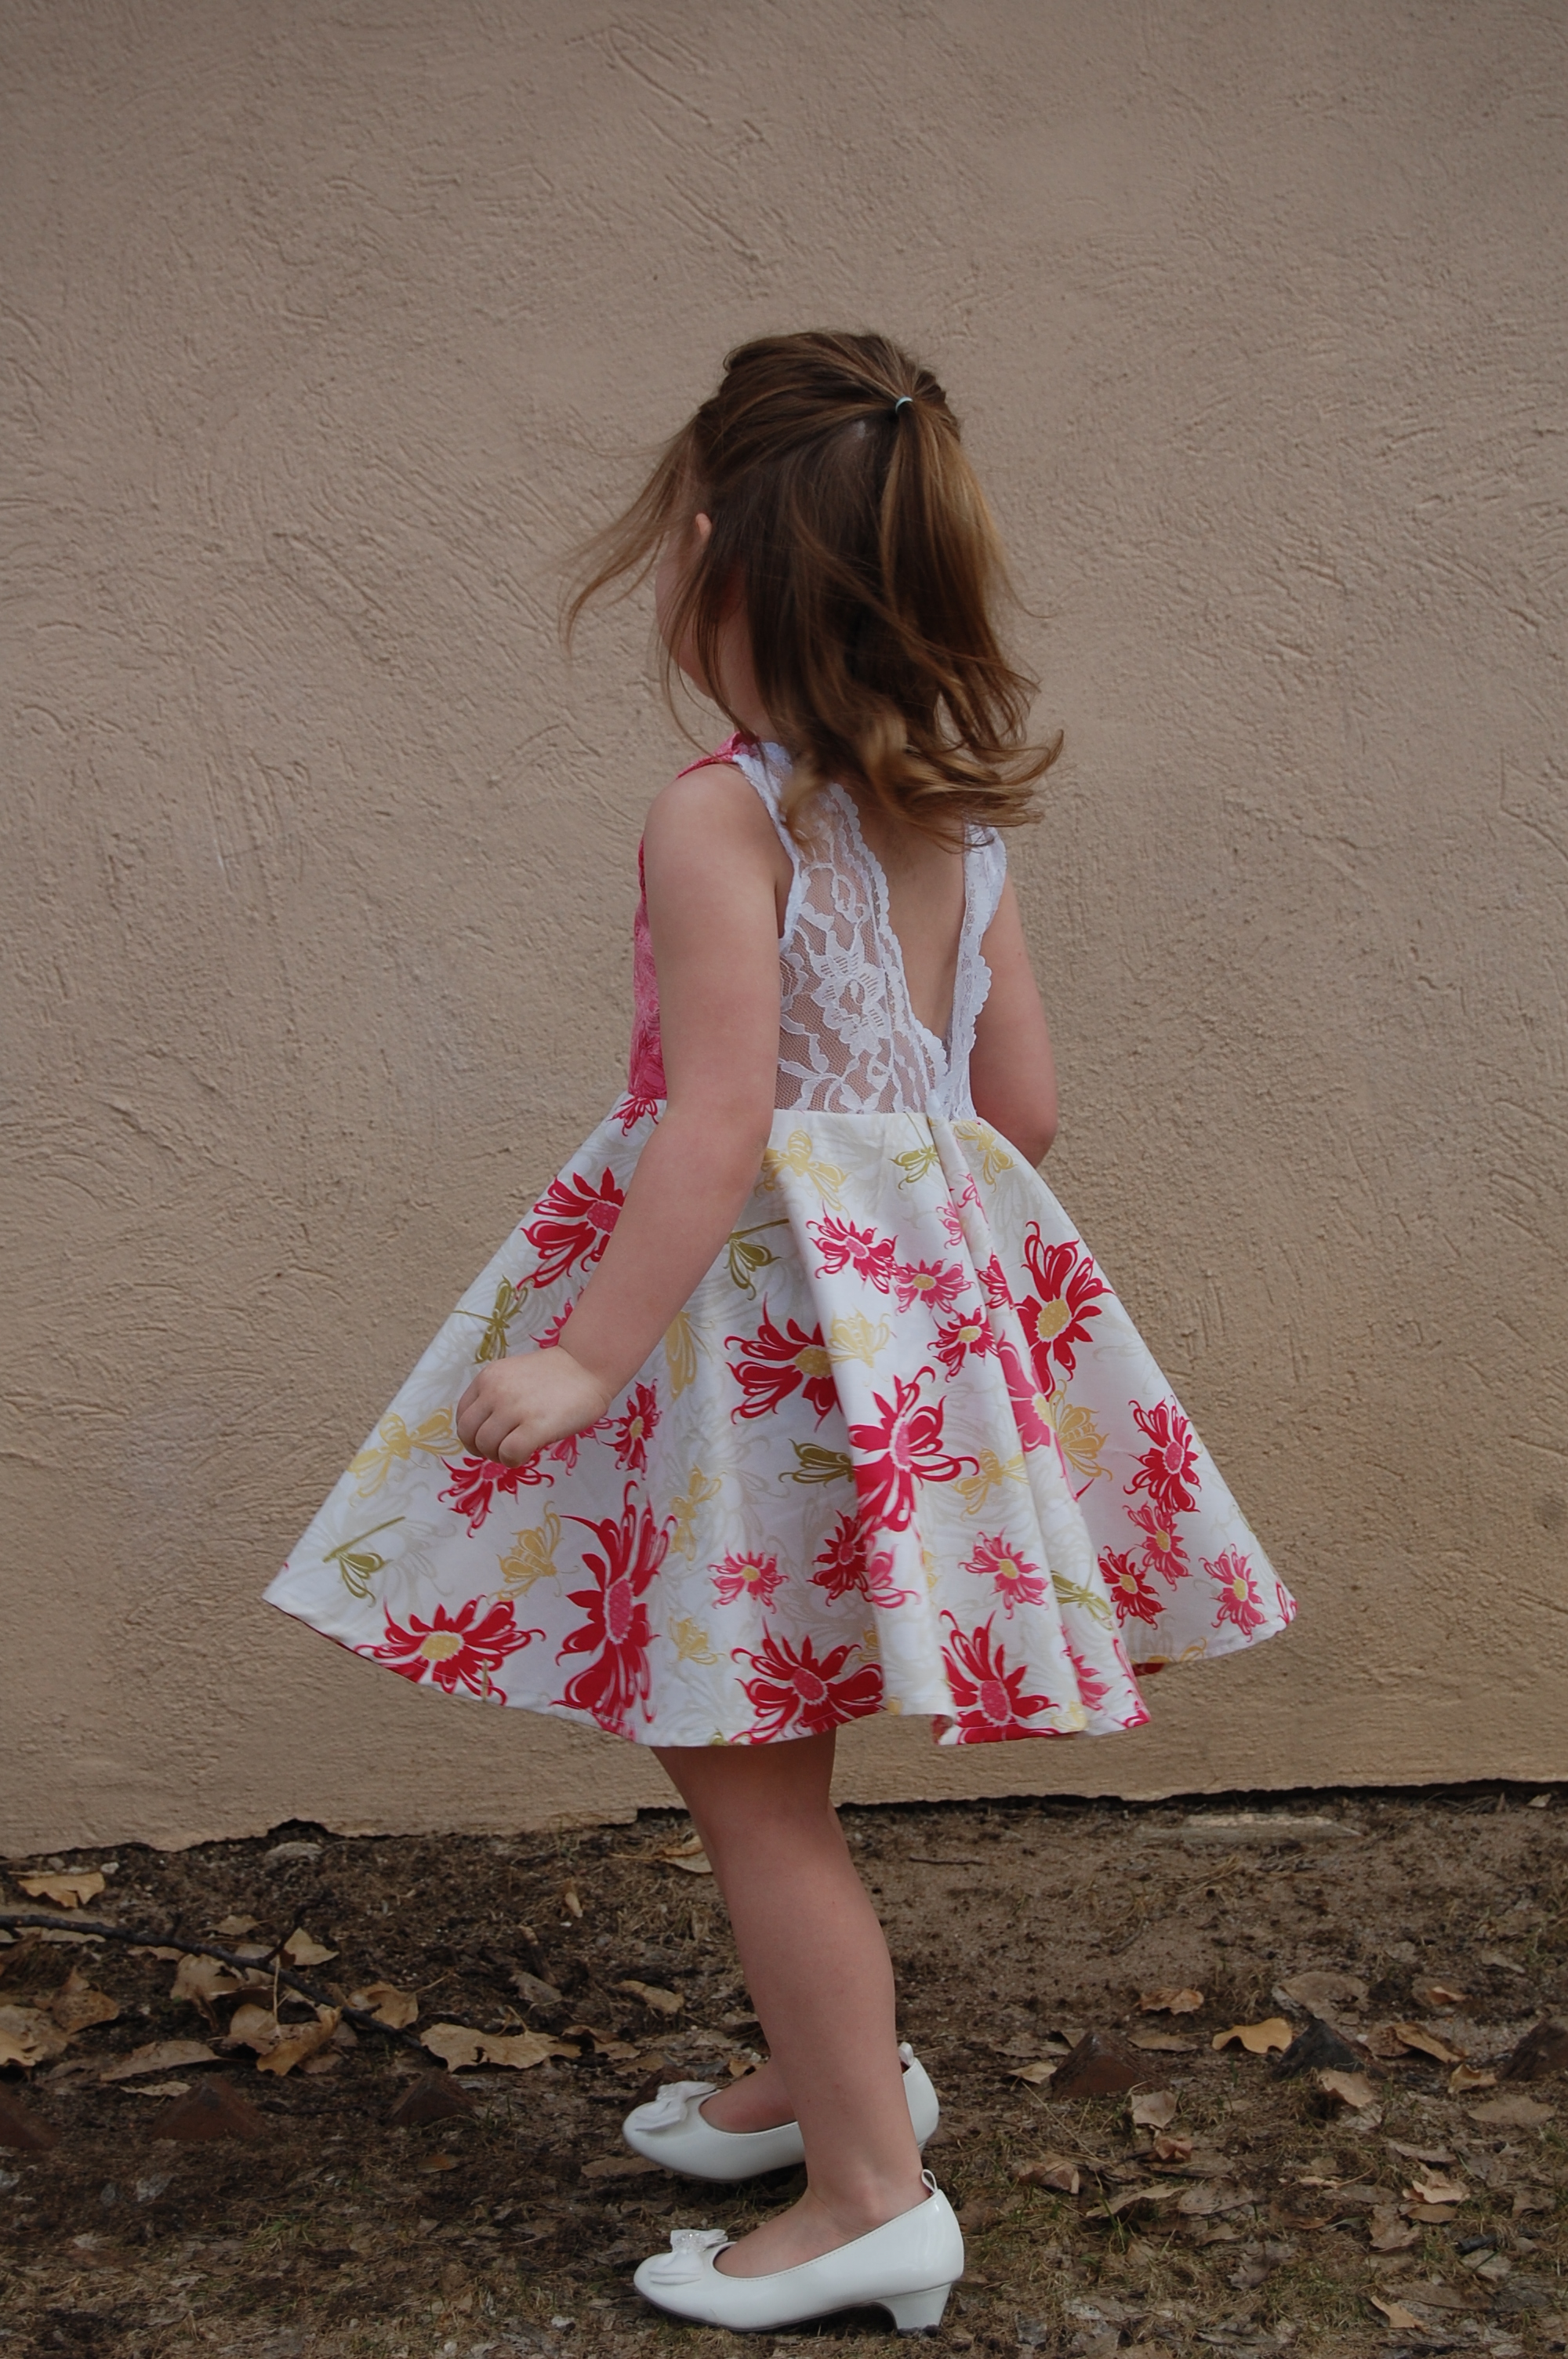
And– did I mention the lace back. Dying here.

Breanna’s shorts/capris/pants are super cute with their peek-a-boo side tie. Or, leave out the peek a boo, and fill your wardrobe with quick and easy pair of simple shorts/capris/pants.
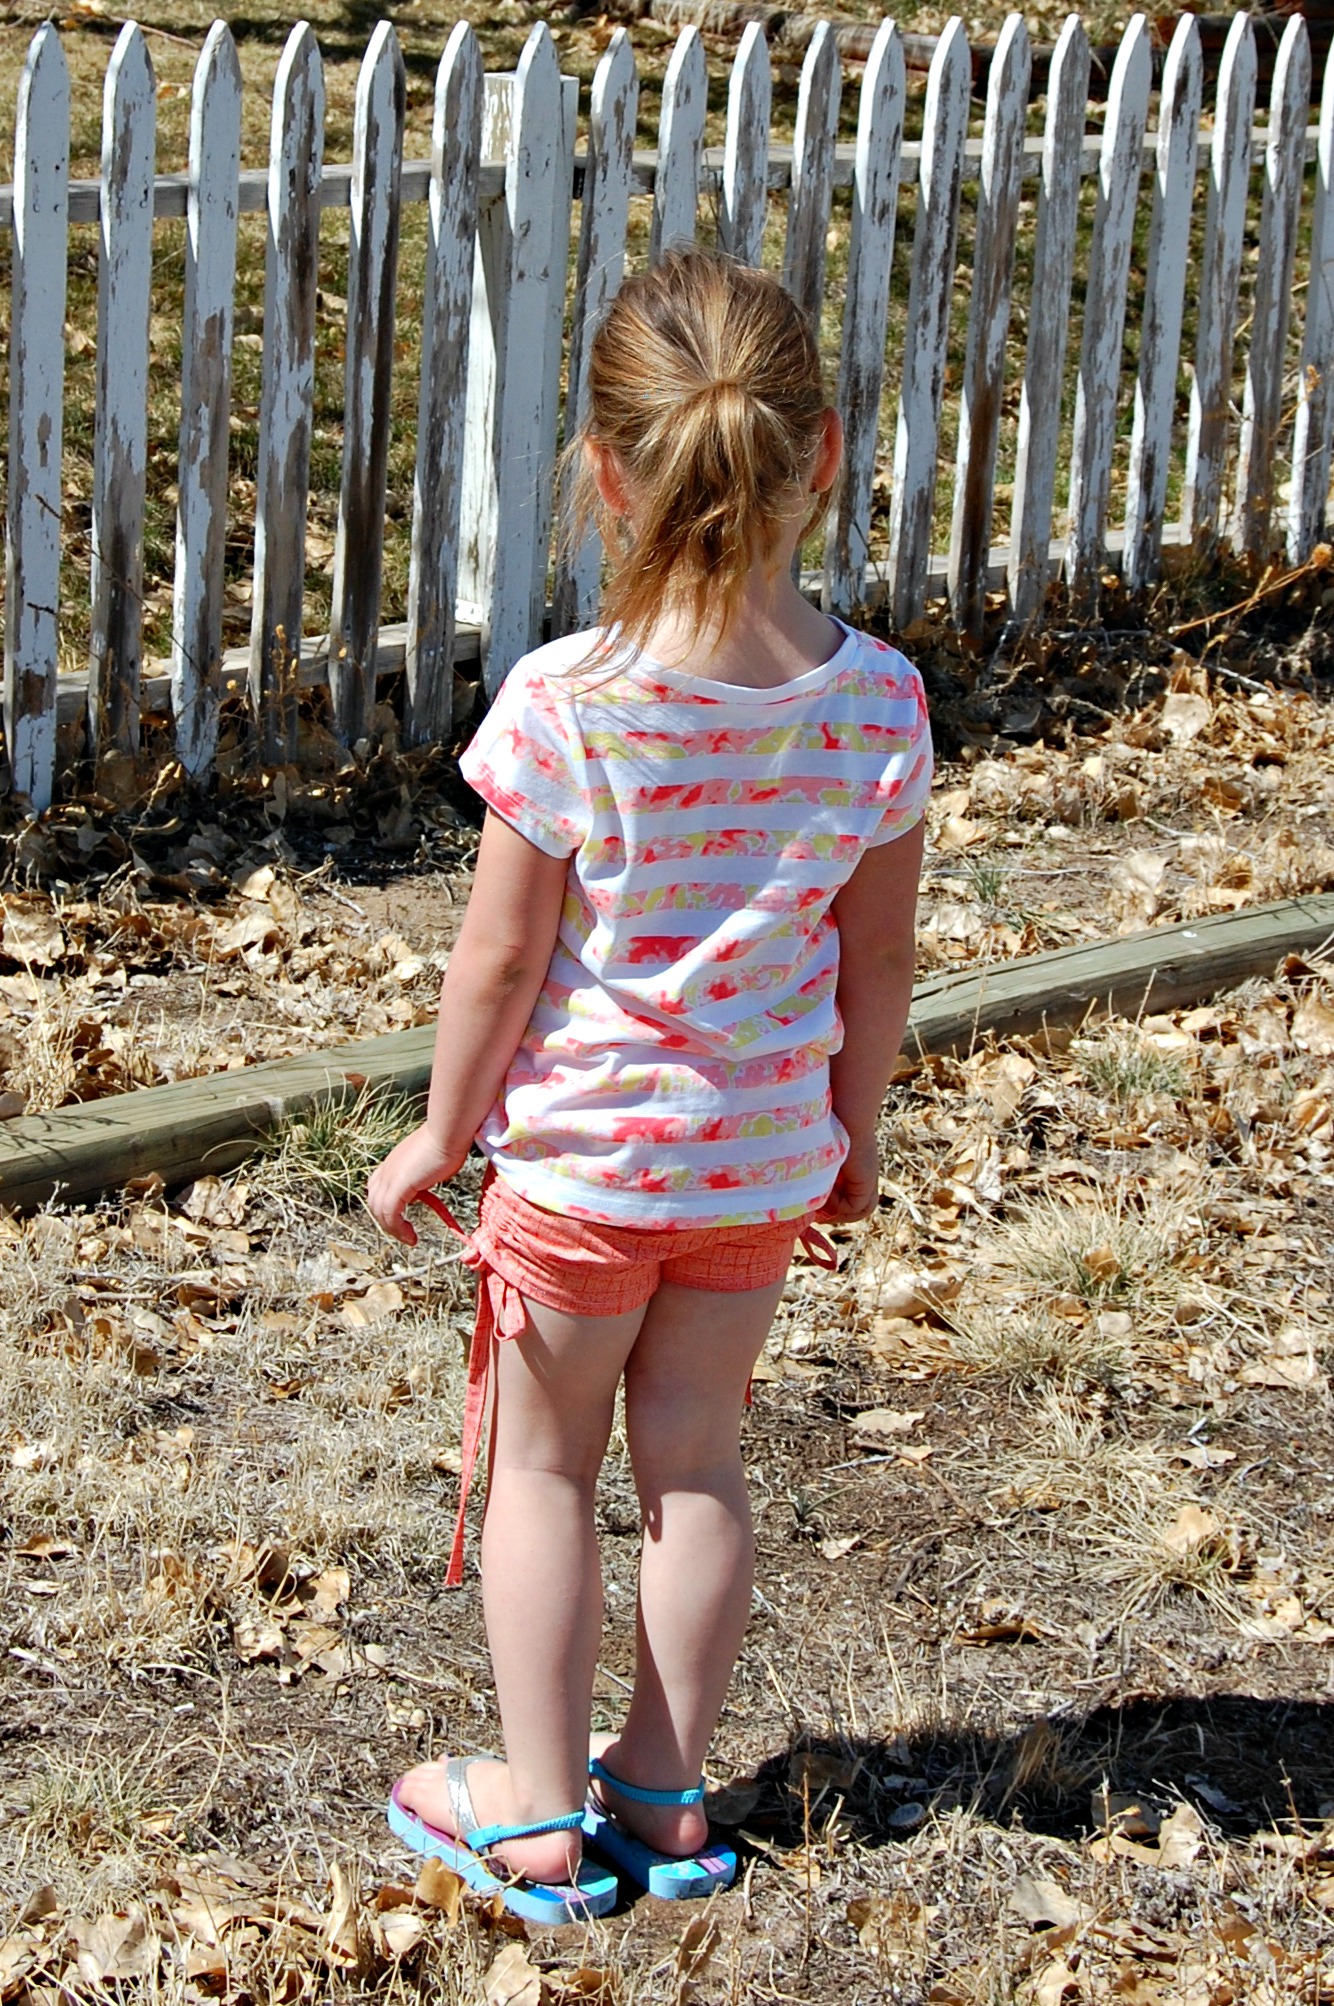
Options! You all know, I say it again and again, I love a pattern that is versatile and offers many options!
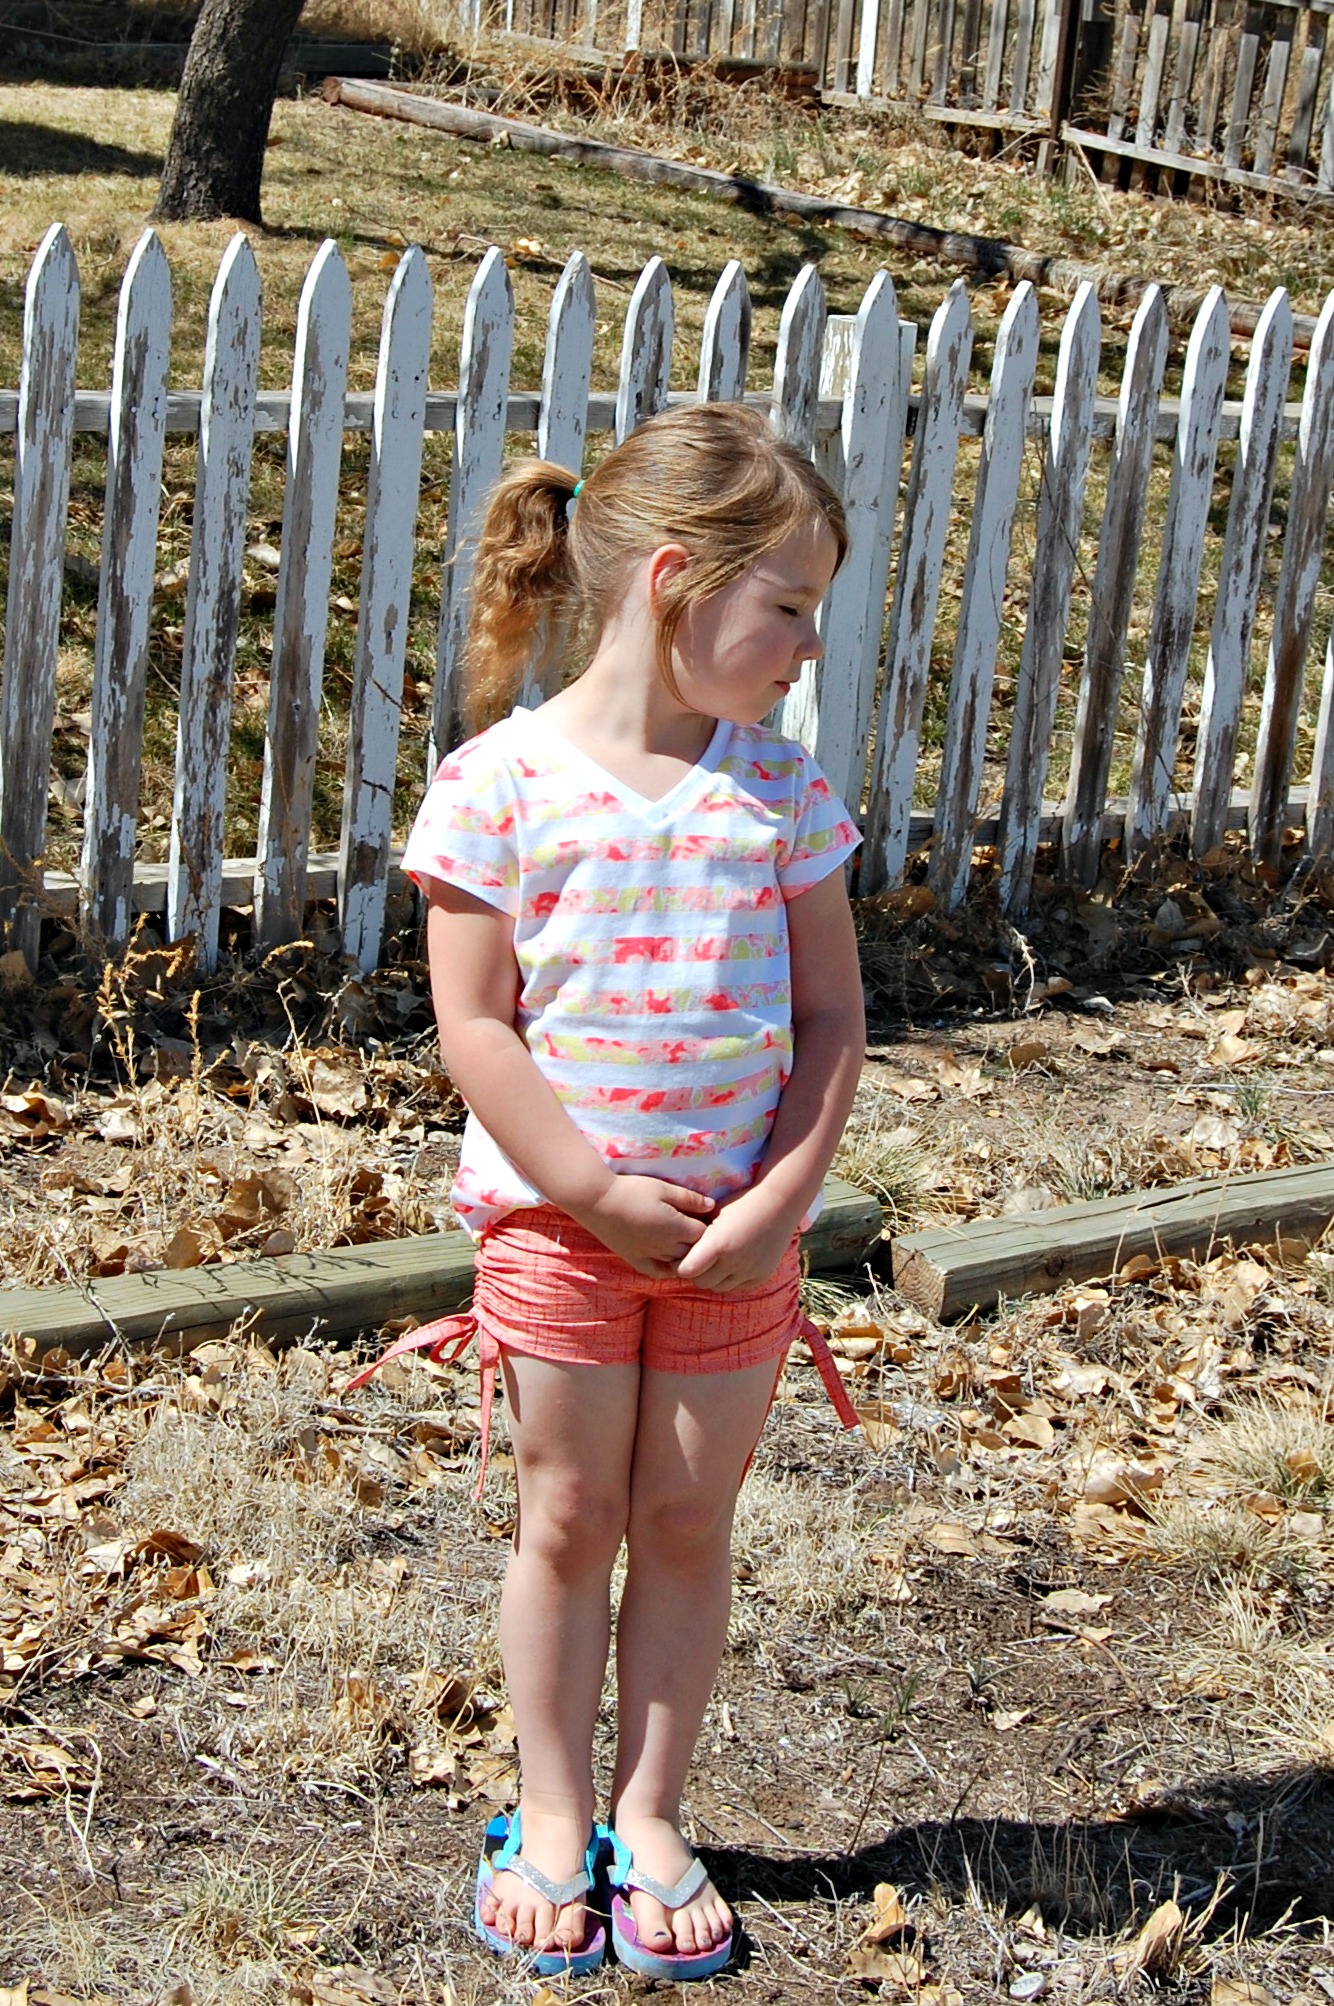
Linnaea was rocking her super model talent with these shorts. She just loves being in front of the camera. My sweet girl.
Get Ayda’s HERE and Breanna’s HERE, for 25% off!! Hurry!! (And, you may notice that for a limited time ALL patterns and bundles have been marked down…. Happy Easter!)
Straight Stitch Designs: Laurelhurst
I had the opportunity to test another pattern for Straight Stitch Designs! She is quickly becoming one of my favorite designers! I am really starting to love making things for ME. I am so used to sewing for my girls and everyone else, that it feels really nice to sew for myself every now and then. And Kimberly’s designs not only come in my size, but they fit GREAT too!

The Laurelhurst is a beautiful cardigan with a draped front. You could really make this in whatever knit you want, but I found this thinner, light weight knit to work wonderfully. It’s flowy, and just feels amazing on! I found this particular knit at JoAnn’s. It’s from the newer (to my store at least) “Doodle” fabric line.

This pattern was an amazingly quick sew, and one of my favorite things about it is that there’s NO HEMMING!! Let me say that again, you don’t have to hem a thing. Unless, of course, you are crazy and enjoy that sort of thing– then you are more than welcome to. But, I have to be honest (if you couldn’t tell already), I sure do enjoy a little break from it!

To save yourself some ink, the pattern also allows you to adjust the layers so that you only print the size you need. Or, if you wanted to print a couple sizes to grade between the 2, this makes things easy as well!

The pattern is a steal at only $10, and for the next few days you can get it HERE for 20% off (Ends the 20th). Trust me, you want to get your hands on this pattern! It will be a staple in my closet this spring, that’s for sure!
My New Journey….
I have struggled with my weight for several years now. Up and down…. more up than down to be quite honest. I have tried tons of fad diets. Eat this, don’t eat that, blah, blah, blah! I woke up one morning, and just decided that enough is enough. I wanted to do something for ME! I wanted to change, find my self confidence again, and maybe help and inspire a few people along the way!
So, I took a giant leap. I bought the 21 Day Fix program, Shakeology, and signed up to be a Beachbody Coach!! Obviously, I am far from having a beach body, so at first I felt a little silly deciding to do this. However, I know that there are SO many other people out there who are dealing with this same struggle. I thought that maybe if they saw me do it, then they’d be motivated to do it, too!

My journey started on January 26, 2015. To date, I have lost about 16lbs and over 12″! I thought I’d take this opportunity to share a couple things I’ve learned in the last few weeks!

First, I learned to plan, plan, PLAN! Every Sunday I sit down and write a menu for the coming week. I plan everything we eat on everyday. Breakfast, lunch, dinner, and even snacks. I head to the grocery store with my very specific grocery list, then head home and prep as much as I can for the week. (Salads portioned into mason jars, fruits portioned into snack bags, chicken breast cooked and portioned, etc). Those few hours every Sunday truly set my entire week up for success!

The next thing I’ve learned, is that a support group is HUGE! You can’t be expected to do this on your own! Everyone stumbles, everyone has bad days, everyone needs a pep talk every now and then. And with a support group, this is possible! They help keep me accountable– and motivated when I am feeling down.

Finally, I have learned that this is indeed a journey. Results do not happen overnight. It takes hard work, dedication, and PATIENCE! You have to be easy on yourself (I’m still working on this one!), and know that eventually you will get to where you want to be.

With that being said, I would also like to add that I will be hosting a 5 day clean eating group starting on March 16th. I will provide a full menu, a shopping list, and 5 daily 30 minute workouts. I encourage you to join! Go to my Facebook page HERE and check out the pinned post for more info/to sign up!
Looking for a health coach? Sign up for a FREE account with me HERE, and click “Join Team Beachbody”
Have some health questions, write to me on my Facebook page! I’d love to help you! We can do this together!
Straight Stitch Designs: Bellevue
I am late on getting this posted, but am exited to share my latest pattern test with you all!
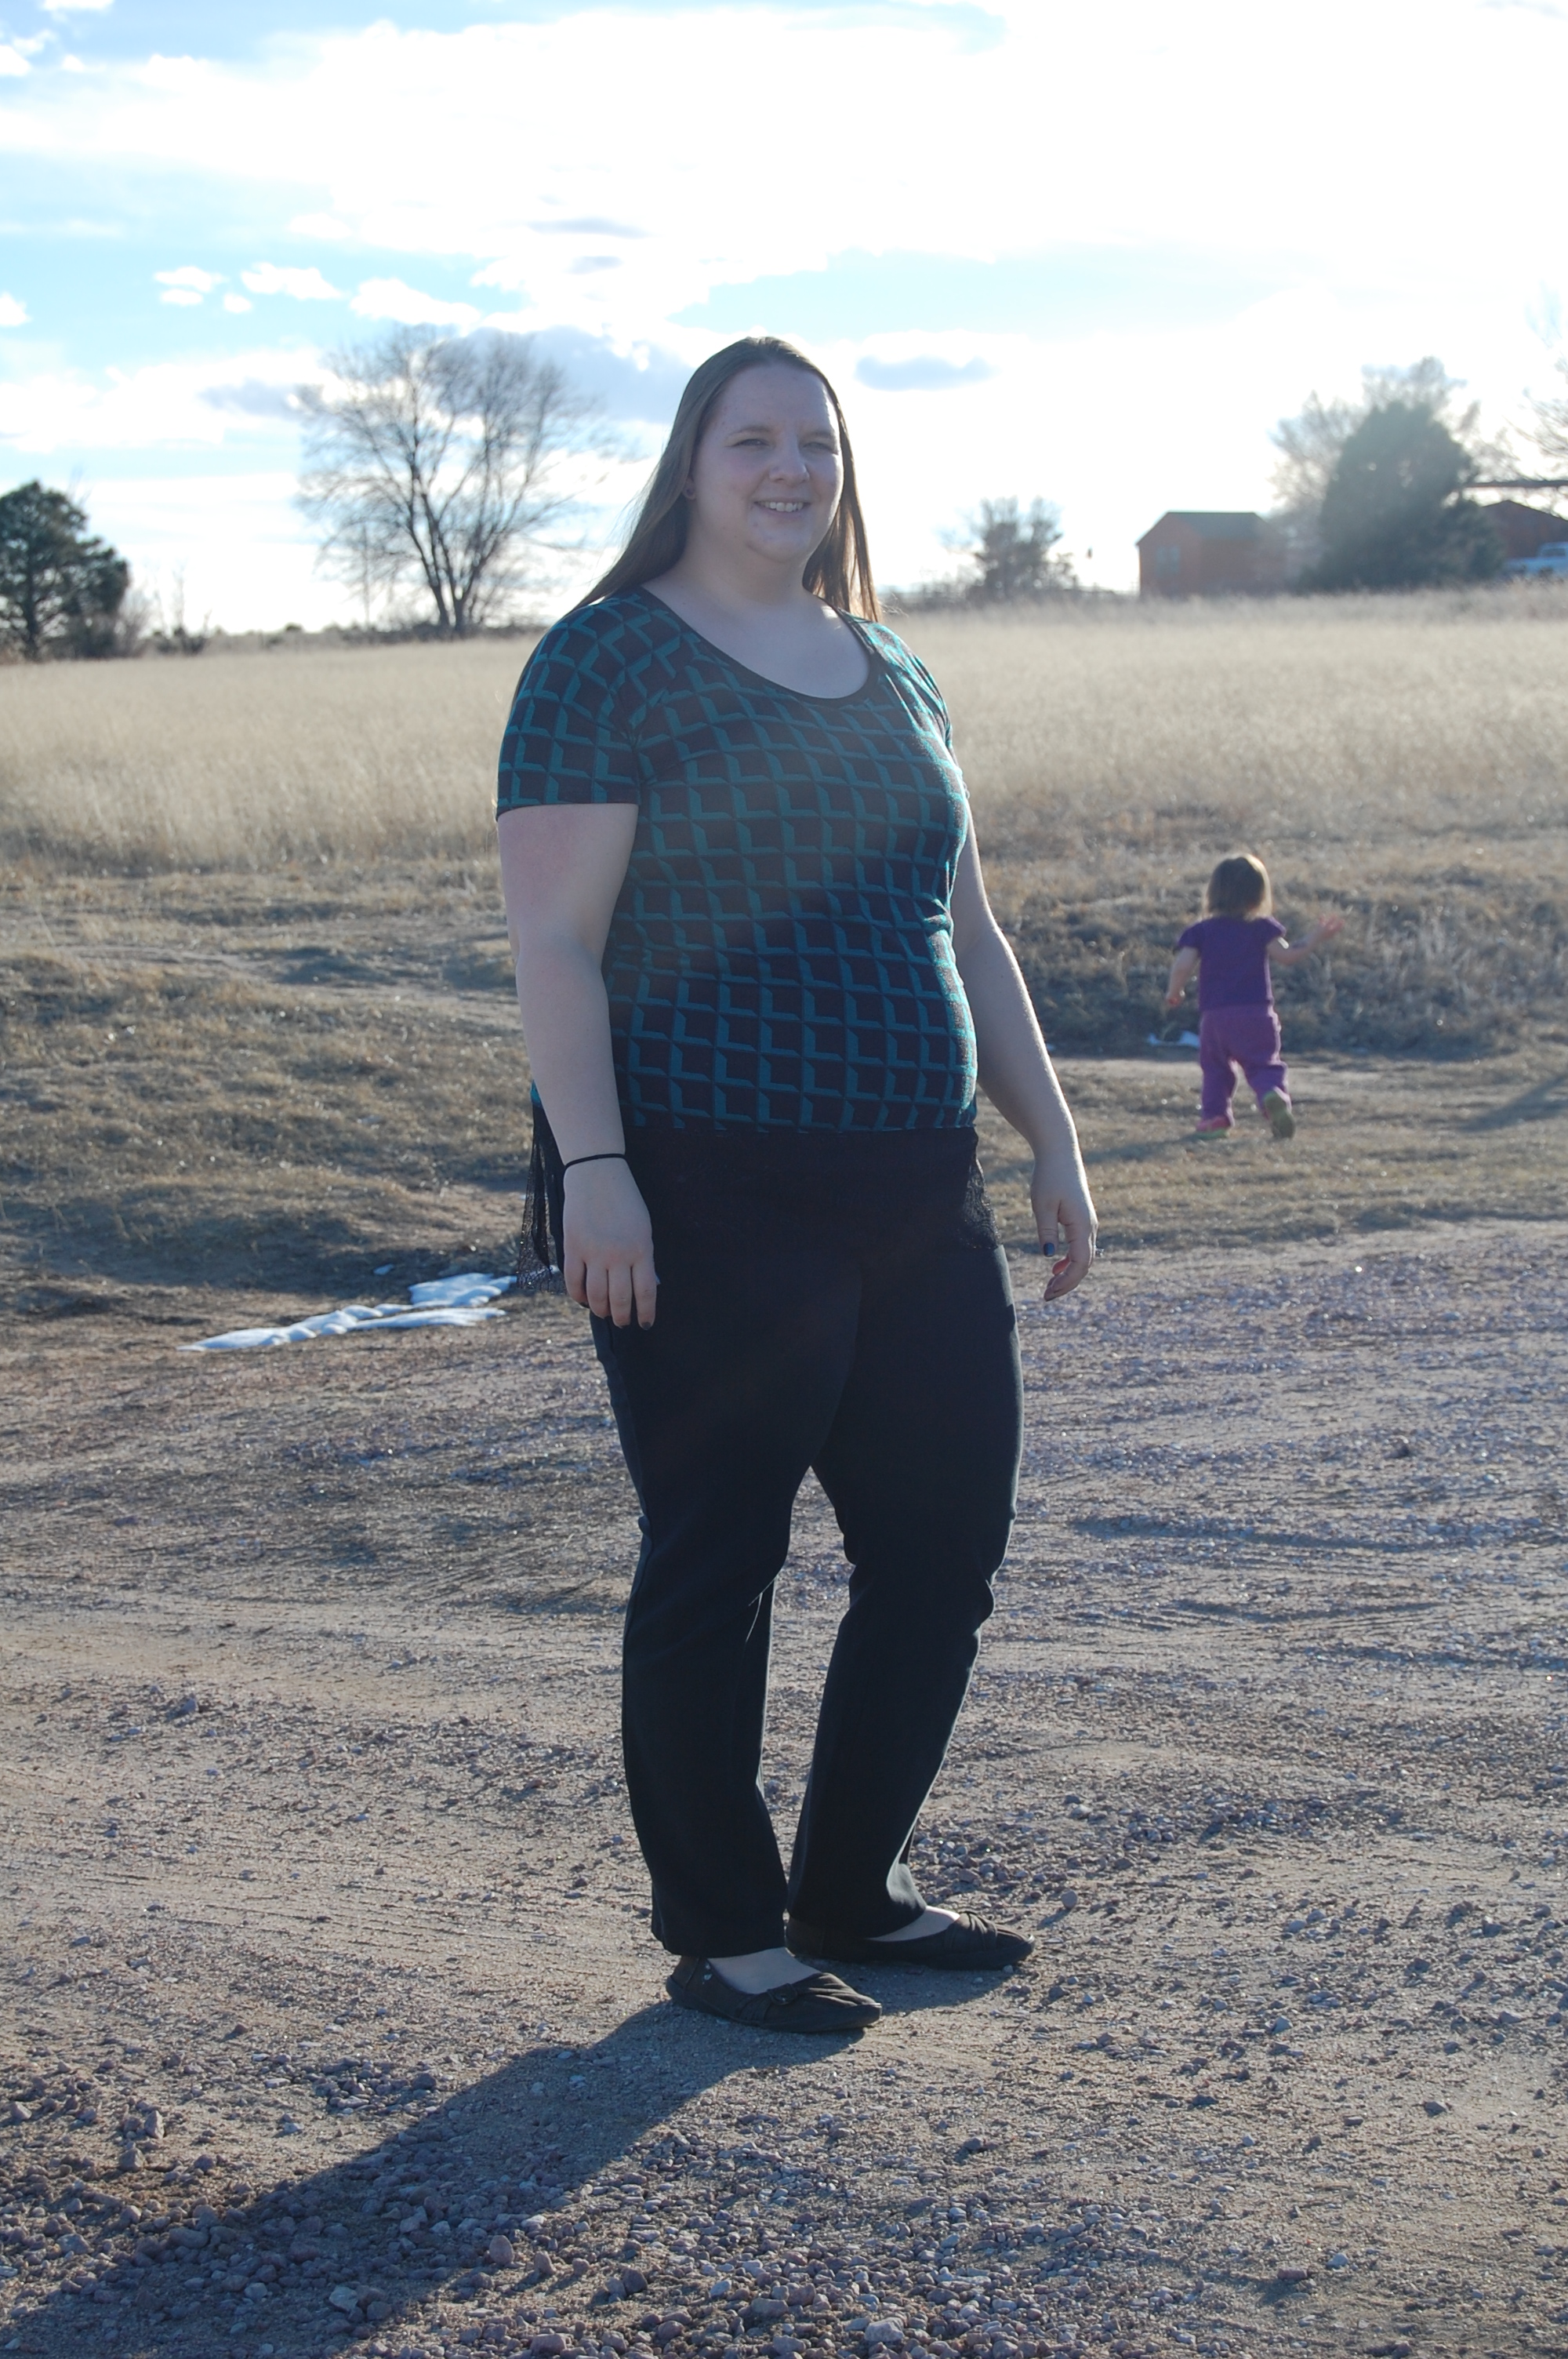
I had the pleasure of testing for Straight Stitch Designs! Kimberly is working on expanding to plus sizes, so this was a great chance for me to help her test the fit. A knit shirt, with beautiful accent piece, this pattern is a quick sew with an amazing result! I really think you could dress this up for any occasion!

I chose to use this geometric jersey knit from Girl Charlee. Even better, it was on sale for CHEAP because it was “slightly flawed” (I have yet to find a single flaw in the 5 yards I purchased). We all know how much this girl loves a bargain!
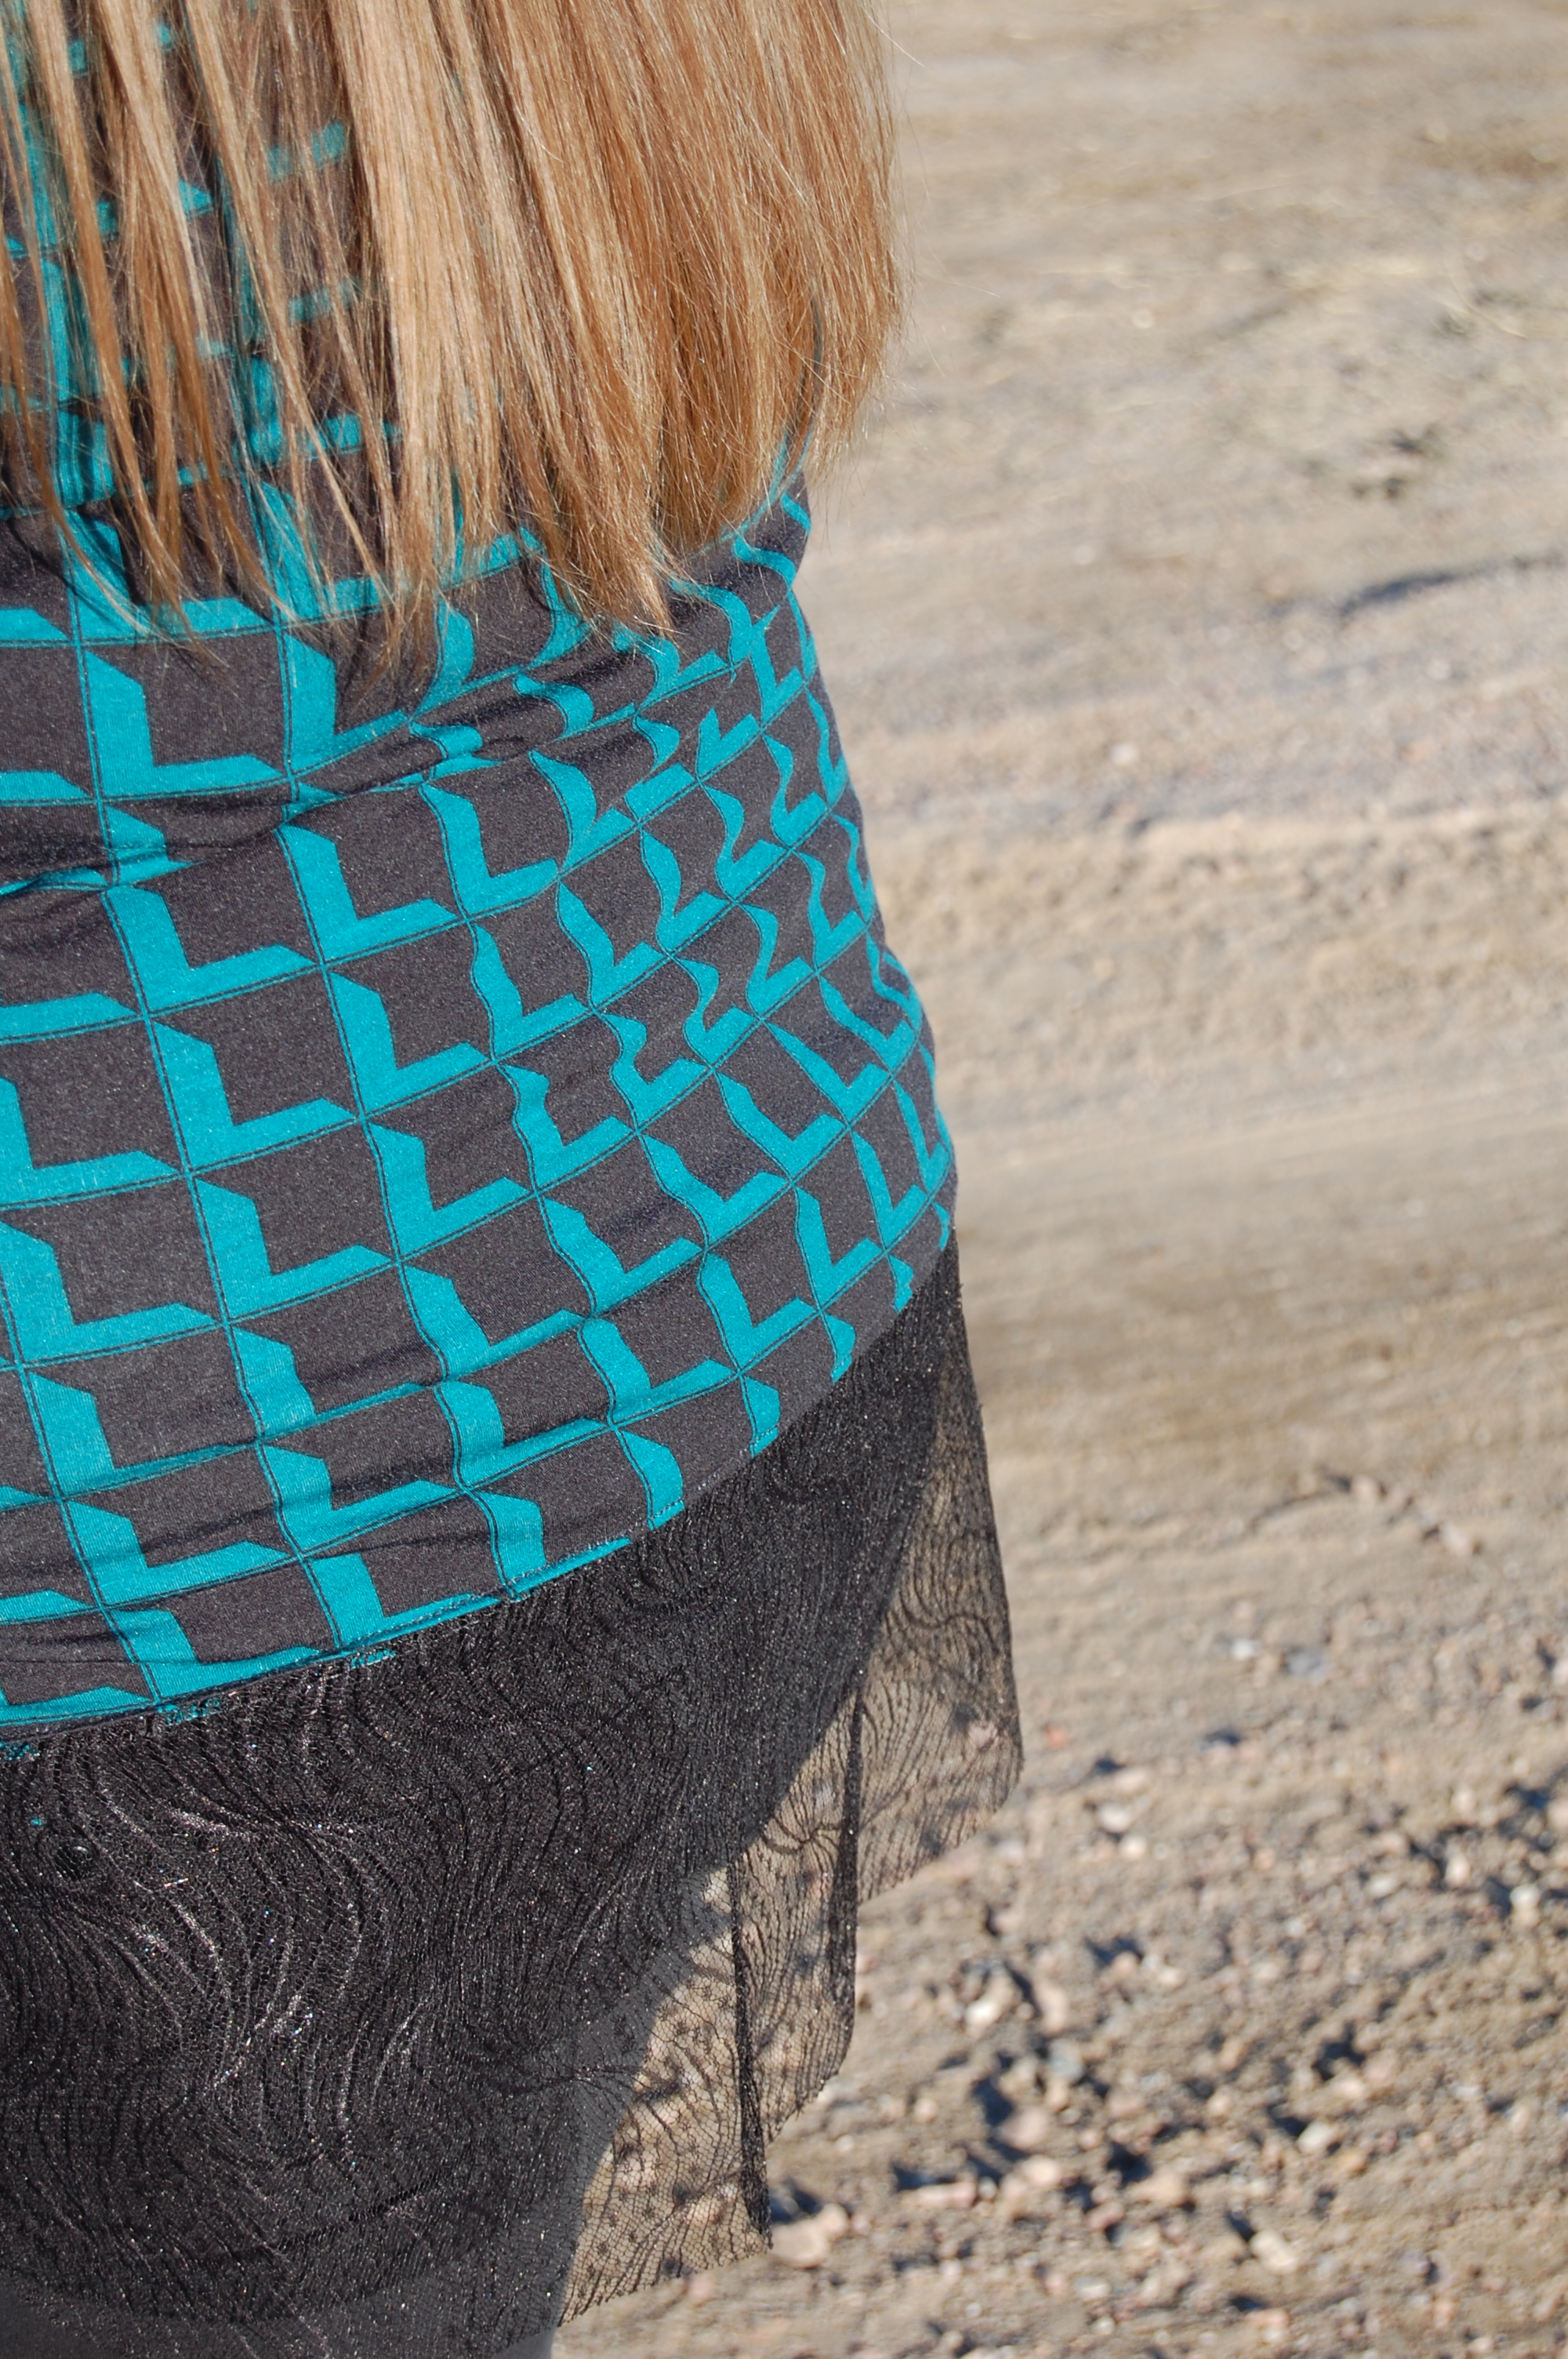
I chose a nice lace as my accent piece (at my husband’s suggestion…. he’s catching on to my crafty ways!) And I think it worked out beautifully! Other testers used chiffon and light weight wovens, with just as much success. I love the versatility. Use your imagination!

And did I mention what a quick sew this was??From cut to finish, it only took me about an hour! I ended up making 3 tops throughout the testing process, and managed to get each done during nap time. Any pattern that I can complete during nap time, and still have time to do a load of laundry, is a total winner in my book!
Love my little helper in the background!
Check out the tester round up for some inspiration, HERE! And snag a copy of the pattern for yourself HERE!
Simple Life Pattern Company: Emilya’s Pants/Capris/Bermuda Shorts!
It’s been a while since my last post! The holidays really got the best of me this year. Felt like it was all go, go, go all the time. So, it was really nice to sort of relax a bit through January. But, now I’m back with an exciting new post!
Late last month, I applied to be a pattern tester for a new company– Simple Life Pattern Co (SLPco), and, guess what, I was accepted!! So awesome! Katie Skoog, the owner, has been designing for Create Kids Couture, and is now branching off on her own. Today is her big launch, and you have a chance to get her patterns at a discount (more info at the end of this post)

The pattern I tested was Emilya’s pants/capris/bermuda shorts. If you couldn’t tell by the name, this is a pattern with options! And we all know how much I love options!

I made the capris with the optional cuff on the bottom. The pocket is done with coordinating fabric, which I think is a beautiful little detail. There is also an option for a cargo pocket and cute bow! Sizes range from 2T to 12, so perfect for little and big girls, too!!

Talk about a quick and easy sew! And the fit is dead on!! This will certainly be a staple in my girls summer wardrobes. The directions are very straight forward and easy to follow, with pictures taking you through each step. I’d say a beginner should have an easy time navigating through and completing this pattern with ease.

Grab this pattern at a discount HERE, or get the whole SLPco discounted bundle HERE! Hurry, the sale only lasts until Sunday February 8!
Gluten Free Pie Taste Testing
I am the official Thanksgiving pie baker in our family. Every year, I like to try out a few different recipes. This year, we have several family members who, for various reasons, have gone gluten-free. It has been my mission to find a gluten-free pie crust recipe, so that everyone could enjoy some tasty dessert! To have a little fun, we decided to gather everyone together and have a little taste test of 4 different gluten-free options. It was a totally blind taste test, and then we all rated the pies based on taste, texture, how it held together, appearance, and how we like the pie overall. We certainly had a blast, and now I am excited to share those results with you!! Hopefully this will help you choose the perfect gluten-free crust for your holiday pies!
1st Place: Paleo Pie Crust
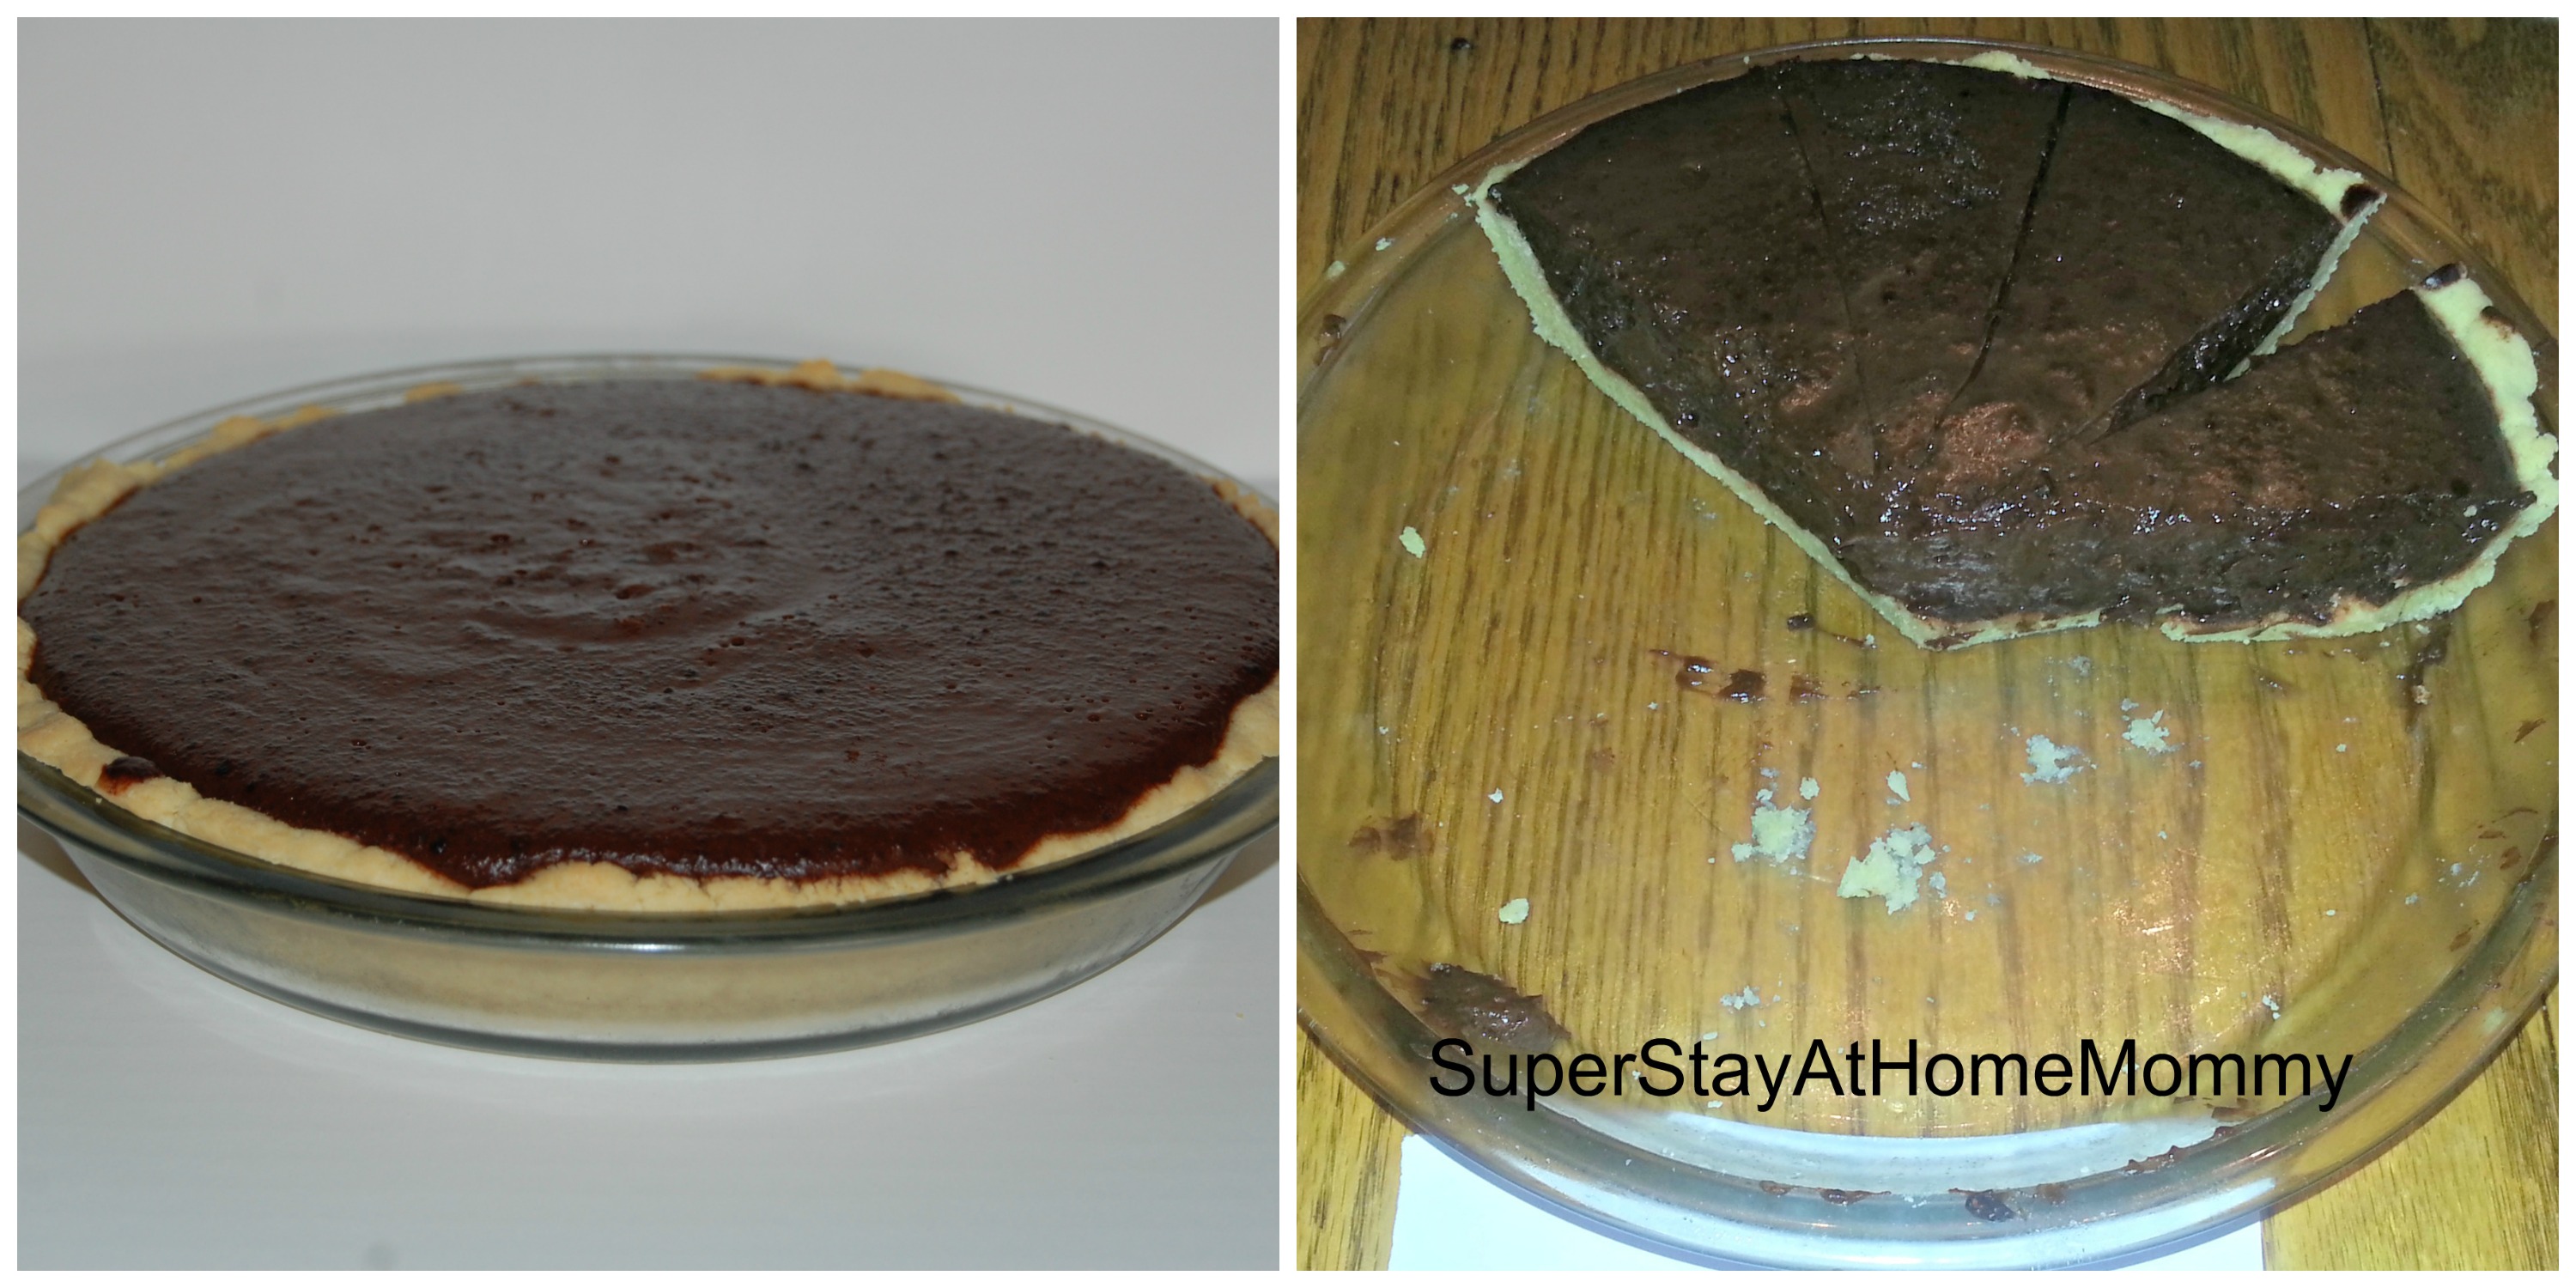
I filled this one with a dark chocolate and coconut pudding.
This pie crust is made with just 4 ingredients- the main component being almond flour. It is pressed into the pie pan, and I found that it was probably the easiest overall to make. It cut apart easily and held together incredibly well. As an added bonus, with the right filling this would work as a low carb crust as well!
Here’s our score breakdown (A total of 35 points possible in each category):
Taste: 33/35 points, 94%
Texture: 30/35 points, 86%
How it held together: 34/35 points, 97%
Appearance: 33/35 points, 94%
Overall: 34/35 points, 97%
Altogether, that brings this pie crust’s official score to: 94%!!
2nd Place: Gluten Free Pie Crust
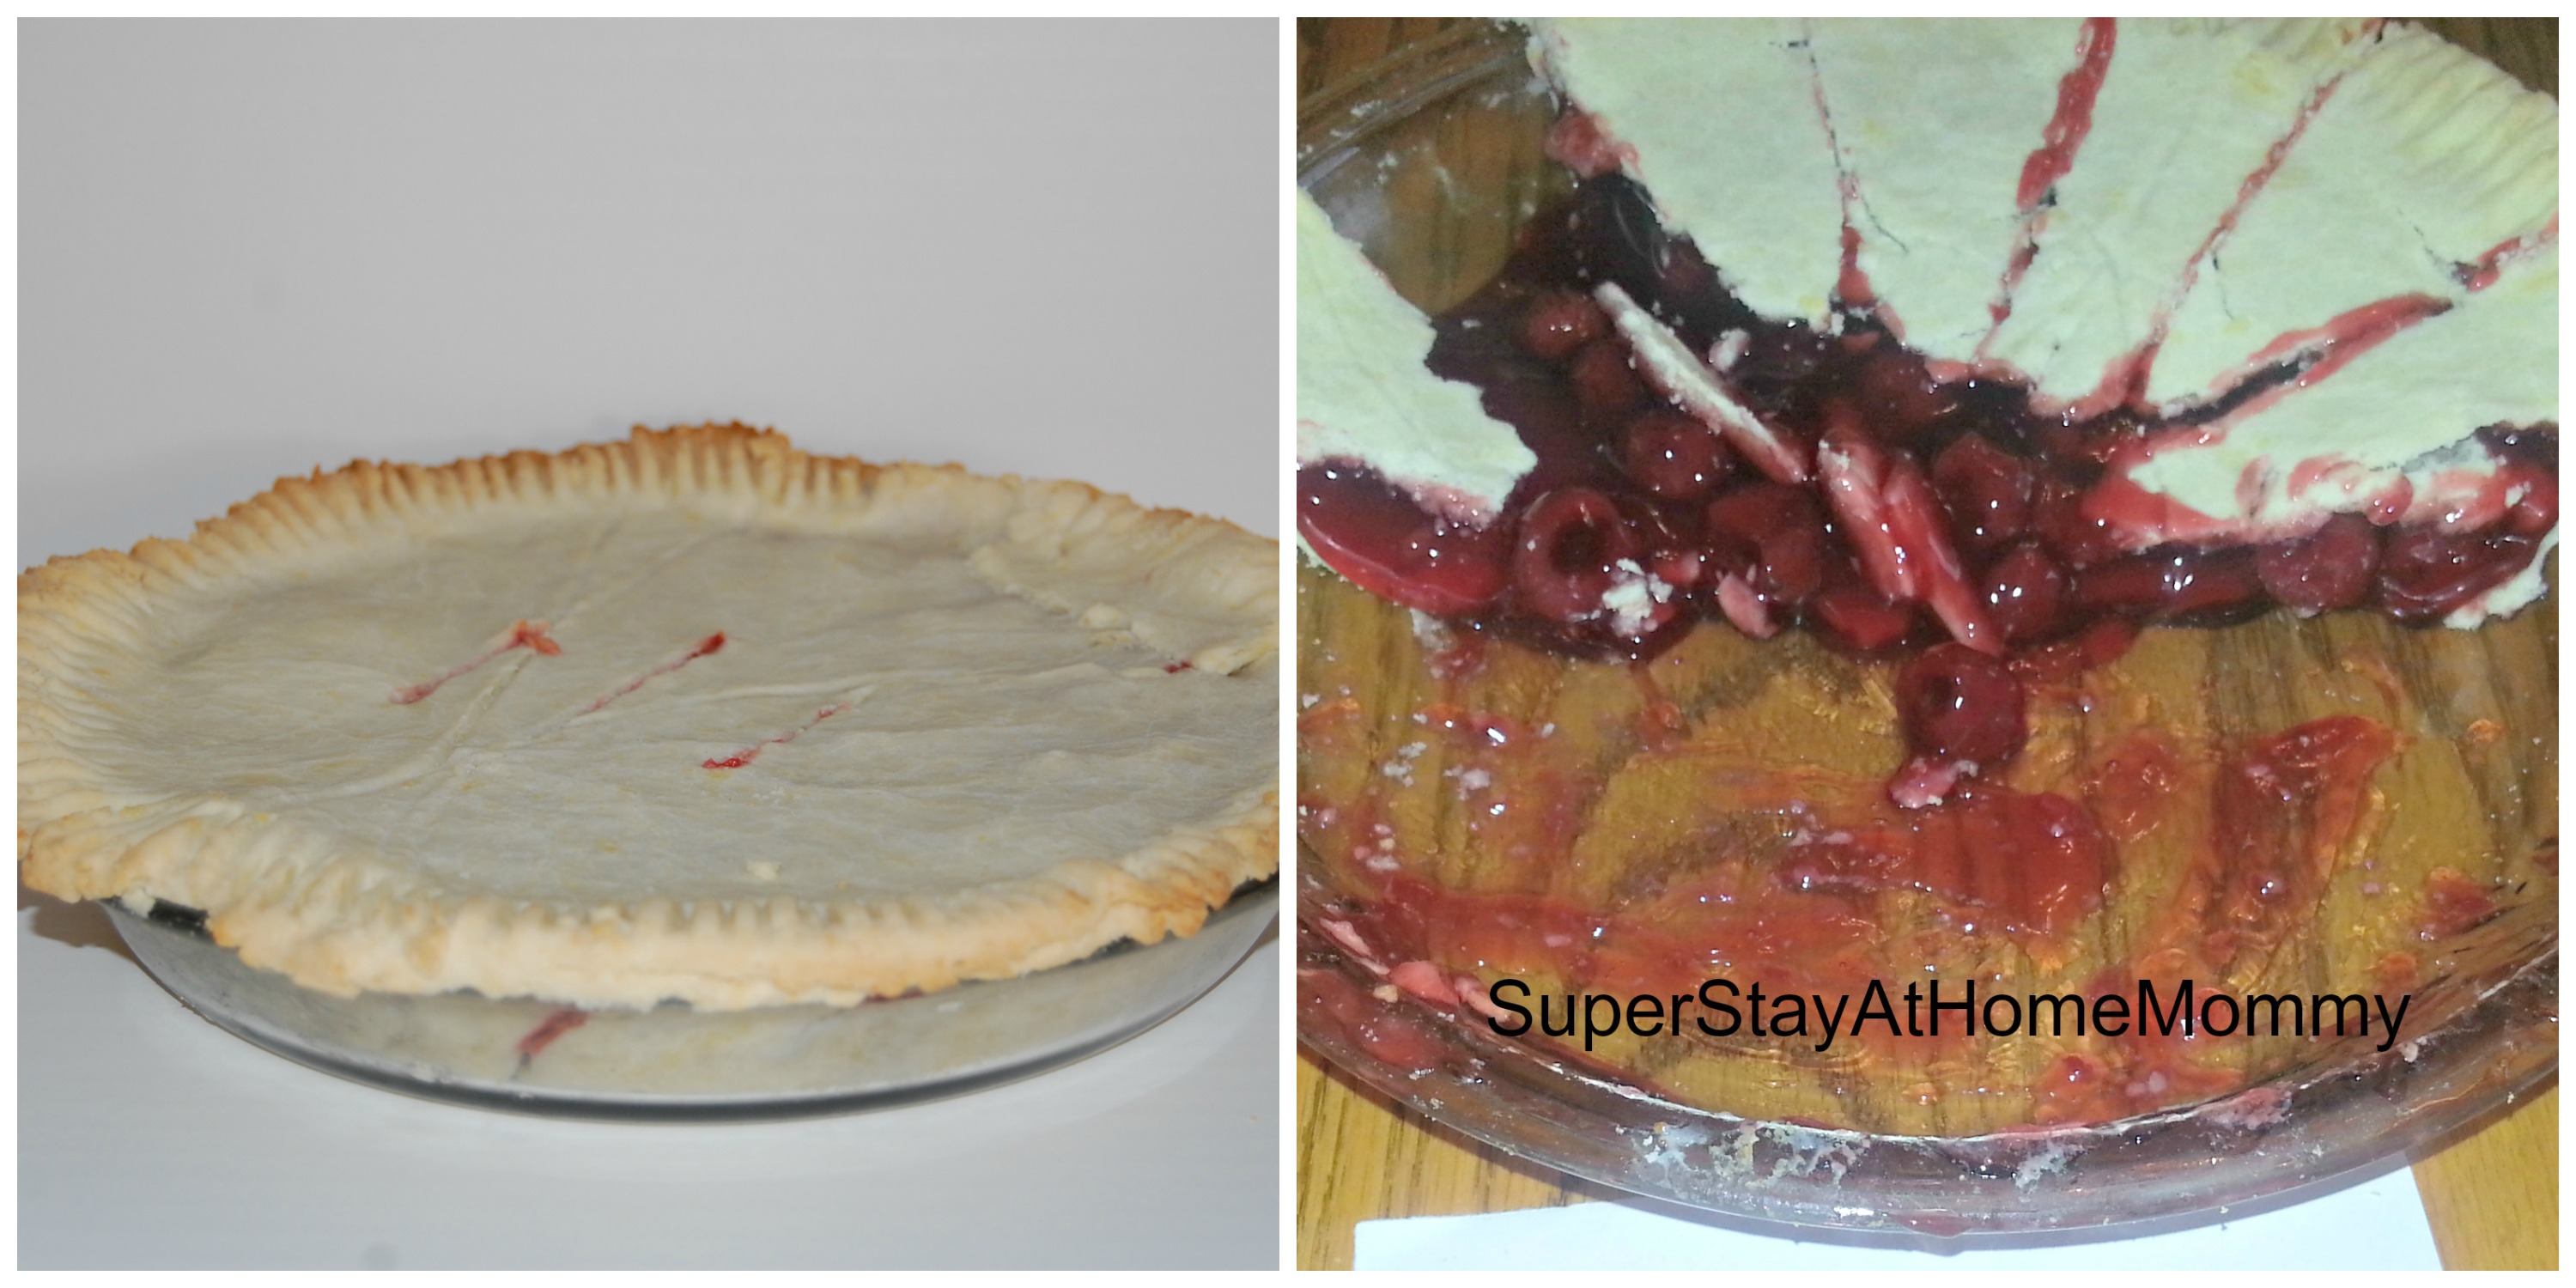
This pie was filled with canned cherry pie filling.
This crust was made using gluten-free flour. The main ingredients in gluten-free flour include rice flour and tapioca flour. It was the only crust that was rolled out with a rolling pin, and, therefore, could have both a top and bottom. To me, it was the one that most resembled a typical pie. We did find that it was a little difficult to cut, which lead to difficulties scooping it out of the pie pan (and therefore lowering its’ score for “how it holds together”). That could, in part, have to do with the fact that the recipe did not include a cook time, so I sort of had to wing it. I ended up cooking it for 30 minutes, which may have been a touch too long, making the crust a little tough.
Here’s our score breakdown (A total of 35 points possible in each category):
Taste: 28/35, 80%
Texture: 29/35, 86%
How it held together: 31/35, 89%
Appearance: 28/35, 80%
Overall: 28/35, 80%
Altogether, that brings this pie crusts official score to: 86%
3rd Place: Paleo Pecan Crust
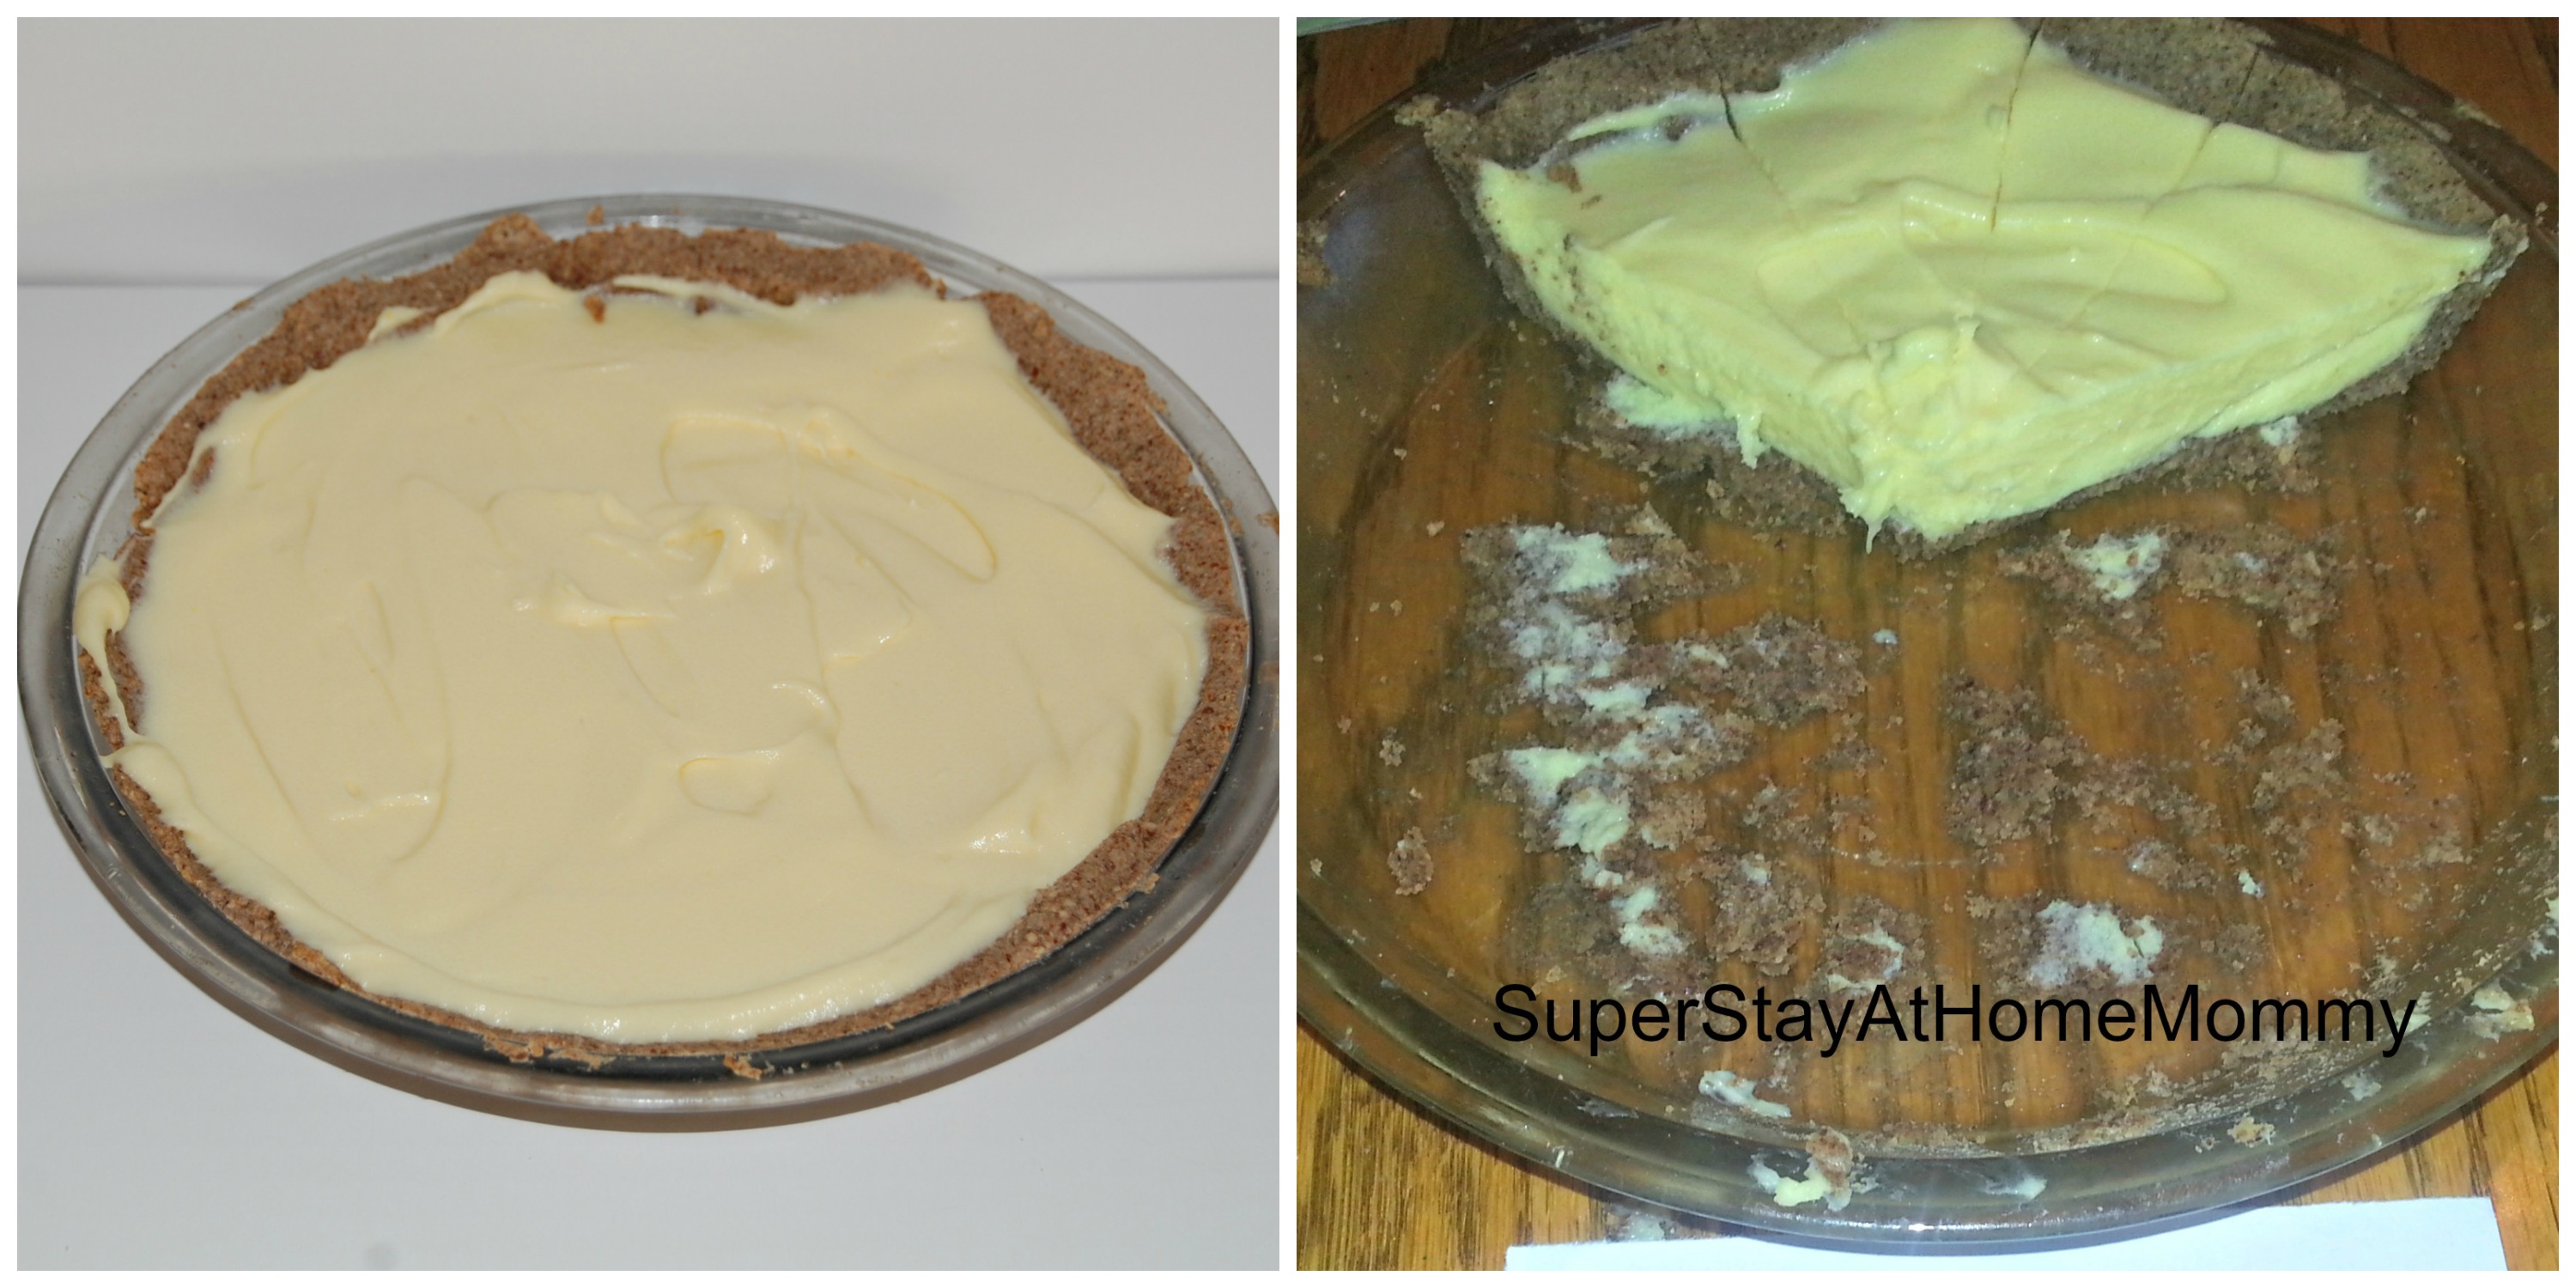
Cheesecake!
This crust is also just 4 ingredients! Its main ingredient is ground pecans. Because of the crumbly nature of the crust, it did not hold together as well, but the flavor is great (as long as you enjoy pecans). I found it to be the perfect crust for a cheesecake. This is also a great low carb option!
Here’s our score breakdown (A total of 35 points possible in each category):
Taste: 26/35, 74%
Texture: 28/35, 80%
How it held together: 19/35, 54%
Appearance: 30/35, 86%
Overall: 25.5/35, 73%
Altogether, that brings this pie crusts official score to: 73%
4th Place: Gluten Free Sugar Cookie
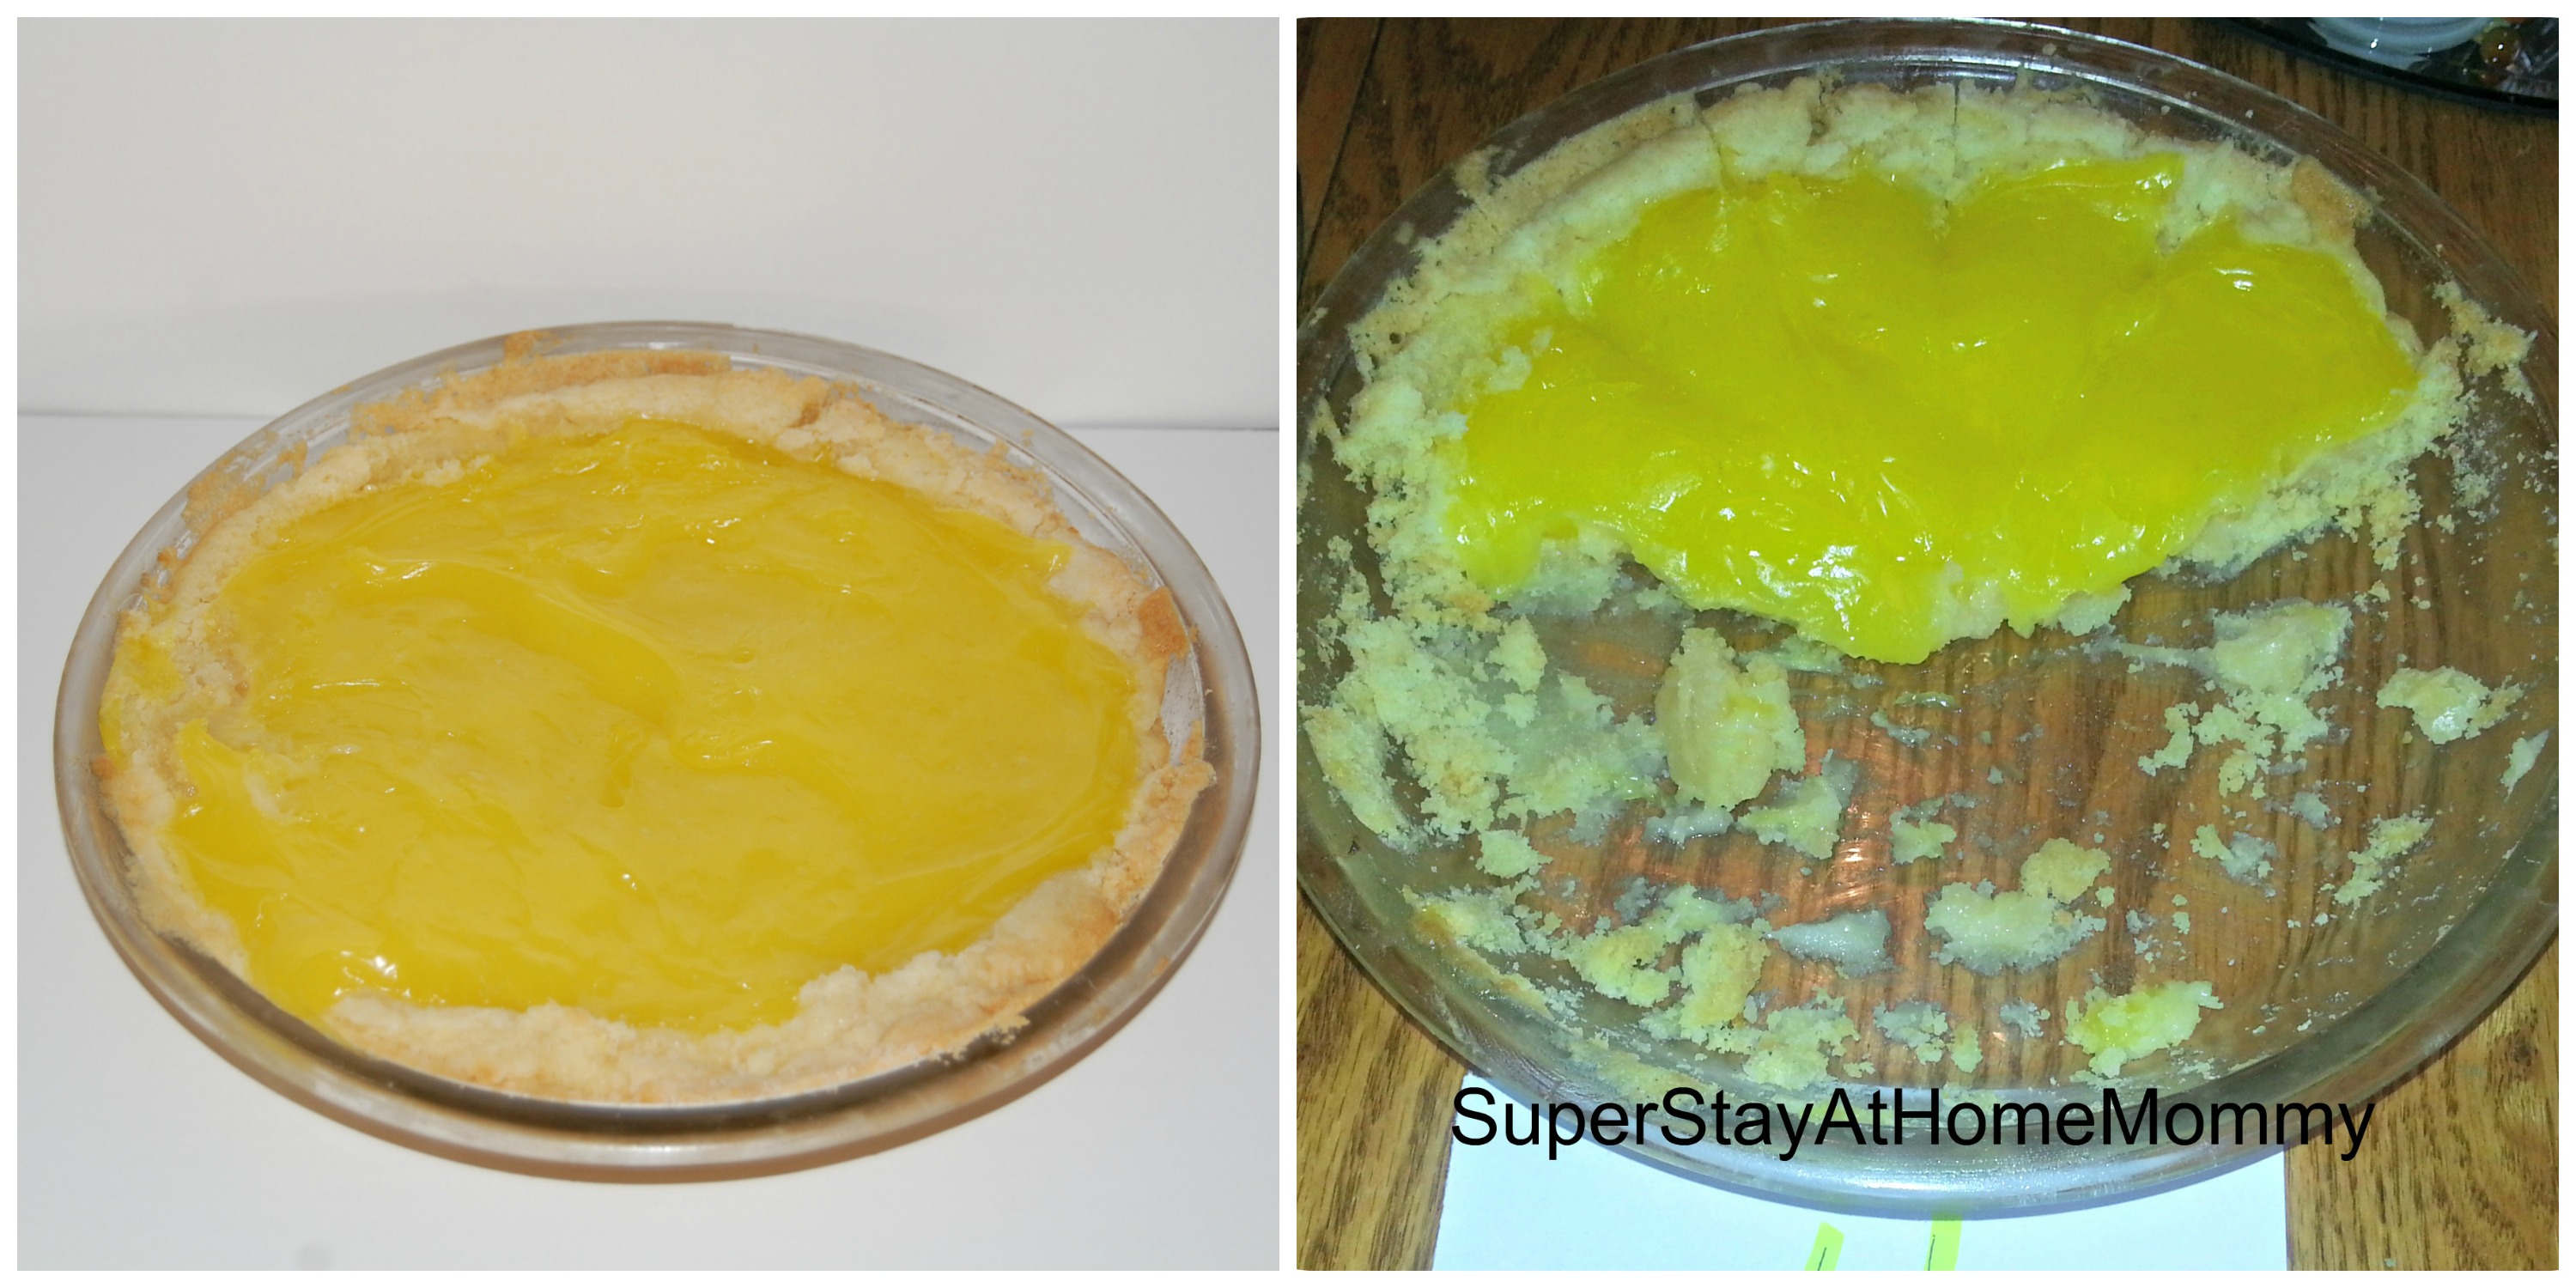
For this one, I used a canned lemon filling
The fact that this came in last place was honestly no surprise to me. It was sort of an experiment after I failed to find my original 4th option in the store. Ideally, I wanted to get the Pillsbury refrigerated gluten-free pie crusts. However, I could not find them anywhere in the store. So, as a Plan B, I went with a gluten-free sugar cookie baking mix by Betty Crocker. There were extreme mixed reviews on this pie. Some loved it, others (myself included), not so much. I’ll let the number speak for themselves…
Here’s our score breakdown (A total of 35 points possible in each category):
Taste: 28/35, 80%
Texture: 21/35, 60%
How it held together: 18/35, 51%
Appearance: 24/35, 69%
Overall: 24/35, 69%
Altogether, that brings this pie crusts official score to: 66%
Now, to take these results and figure out what I’ll do for Thanksgiving…
And if anyone finds one of those Pillsbury gluten-free crusts, I’d love to know how it tastes!
***Because this was solely for the purpose of crust tasting, I took the easy way out on the filling…. If you’re looking for a great homemade filling for your pie, here’s a few of my favorites!
– Pineapple Upsidedown Pie
–Cranberry Cherry Pie
–Pumpkin Cheesecake Pie
Mandy K Designs XOXO Dress!
A couple weeks ago, I was given the opportunity to test a new pattern from Mandy K Designs… The XOXO dress! I am excited to announce that this pattern has now been released for all to sew!
I fell in love with this pattern! It was my first time sewing a pattern by Mandy K Designs, and I was impressed by the amount of details included in the tutorial. I am confident that someone who is more on the beginner side could complete this dress, as the directions she provides are very clear. What an opportunity to learn new techniques!
Who doesn’t love a pattern with options?? This one does not disappoint! There are options for tunic/dress length, ruffled/non-ruffled sweetheart top, rouched ruffle, traditional ruffle. Sizes range from 12 months-14, AND she even includes a doll size!

And the corset back! This dress should fit nicely for a while! Check out the pictures on the sales page, it even layers well!

We made the tunic length with a traditional gathered ruffle. I can’t wait to try out the other options, though. How cute does Miss Jessa look?!?!
You can snag a copy of the pattern for just $5 through November 9! Get it HERE!
Teaching Kids to Sew

Linnaea has been begging me to teach her to sew for a while now. I’ve had her climb onto my lap and help hold fabric while I sew things, but that just wasn’t cutting it anymore. She wanted to sew on her own.
Of course, I couldn’t imagine letting her sit on my machine and sew away, so I started looking for kids sewing machines. I found a cute little toy machine for just $20 and thought I’d struck gold! She was so excited when I brought it home. The excitement ended quickly when we discovered that it was impossible to thread, barely held fabric together, and was so loud that she couldn’t hear me instruct her as she went.
Back to square one. Sitting on Mom’s lap, “sewing.” While out thrifting with my Mother-in-law (one of our favorite things to do!), we stumbled upon a little machine meant for mending clothes. Great! A simple machine, perfect for a kid! And just $10! I rushed home to show Linnaea what we’d found…. And then struggled with the thing for several hours trying to convince it to sew something, ANYTHING. No go. UGH!
With Linnaea’s birthday coming up, we decided it was finally time to just commit and get her the real deal. Find her a real machine that she could actually learn on. And that’s when we found THIS beauty! The Janome was everything I’d been searching for. Just the right size, a guard so her little fingers don’t get hurt by the needle, and simple to use. Most importantly, it works!! And, you can’t go wrong with the fun colors!
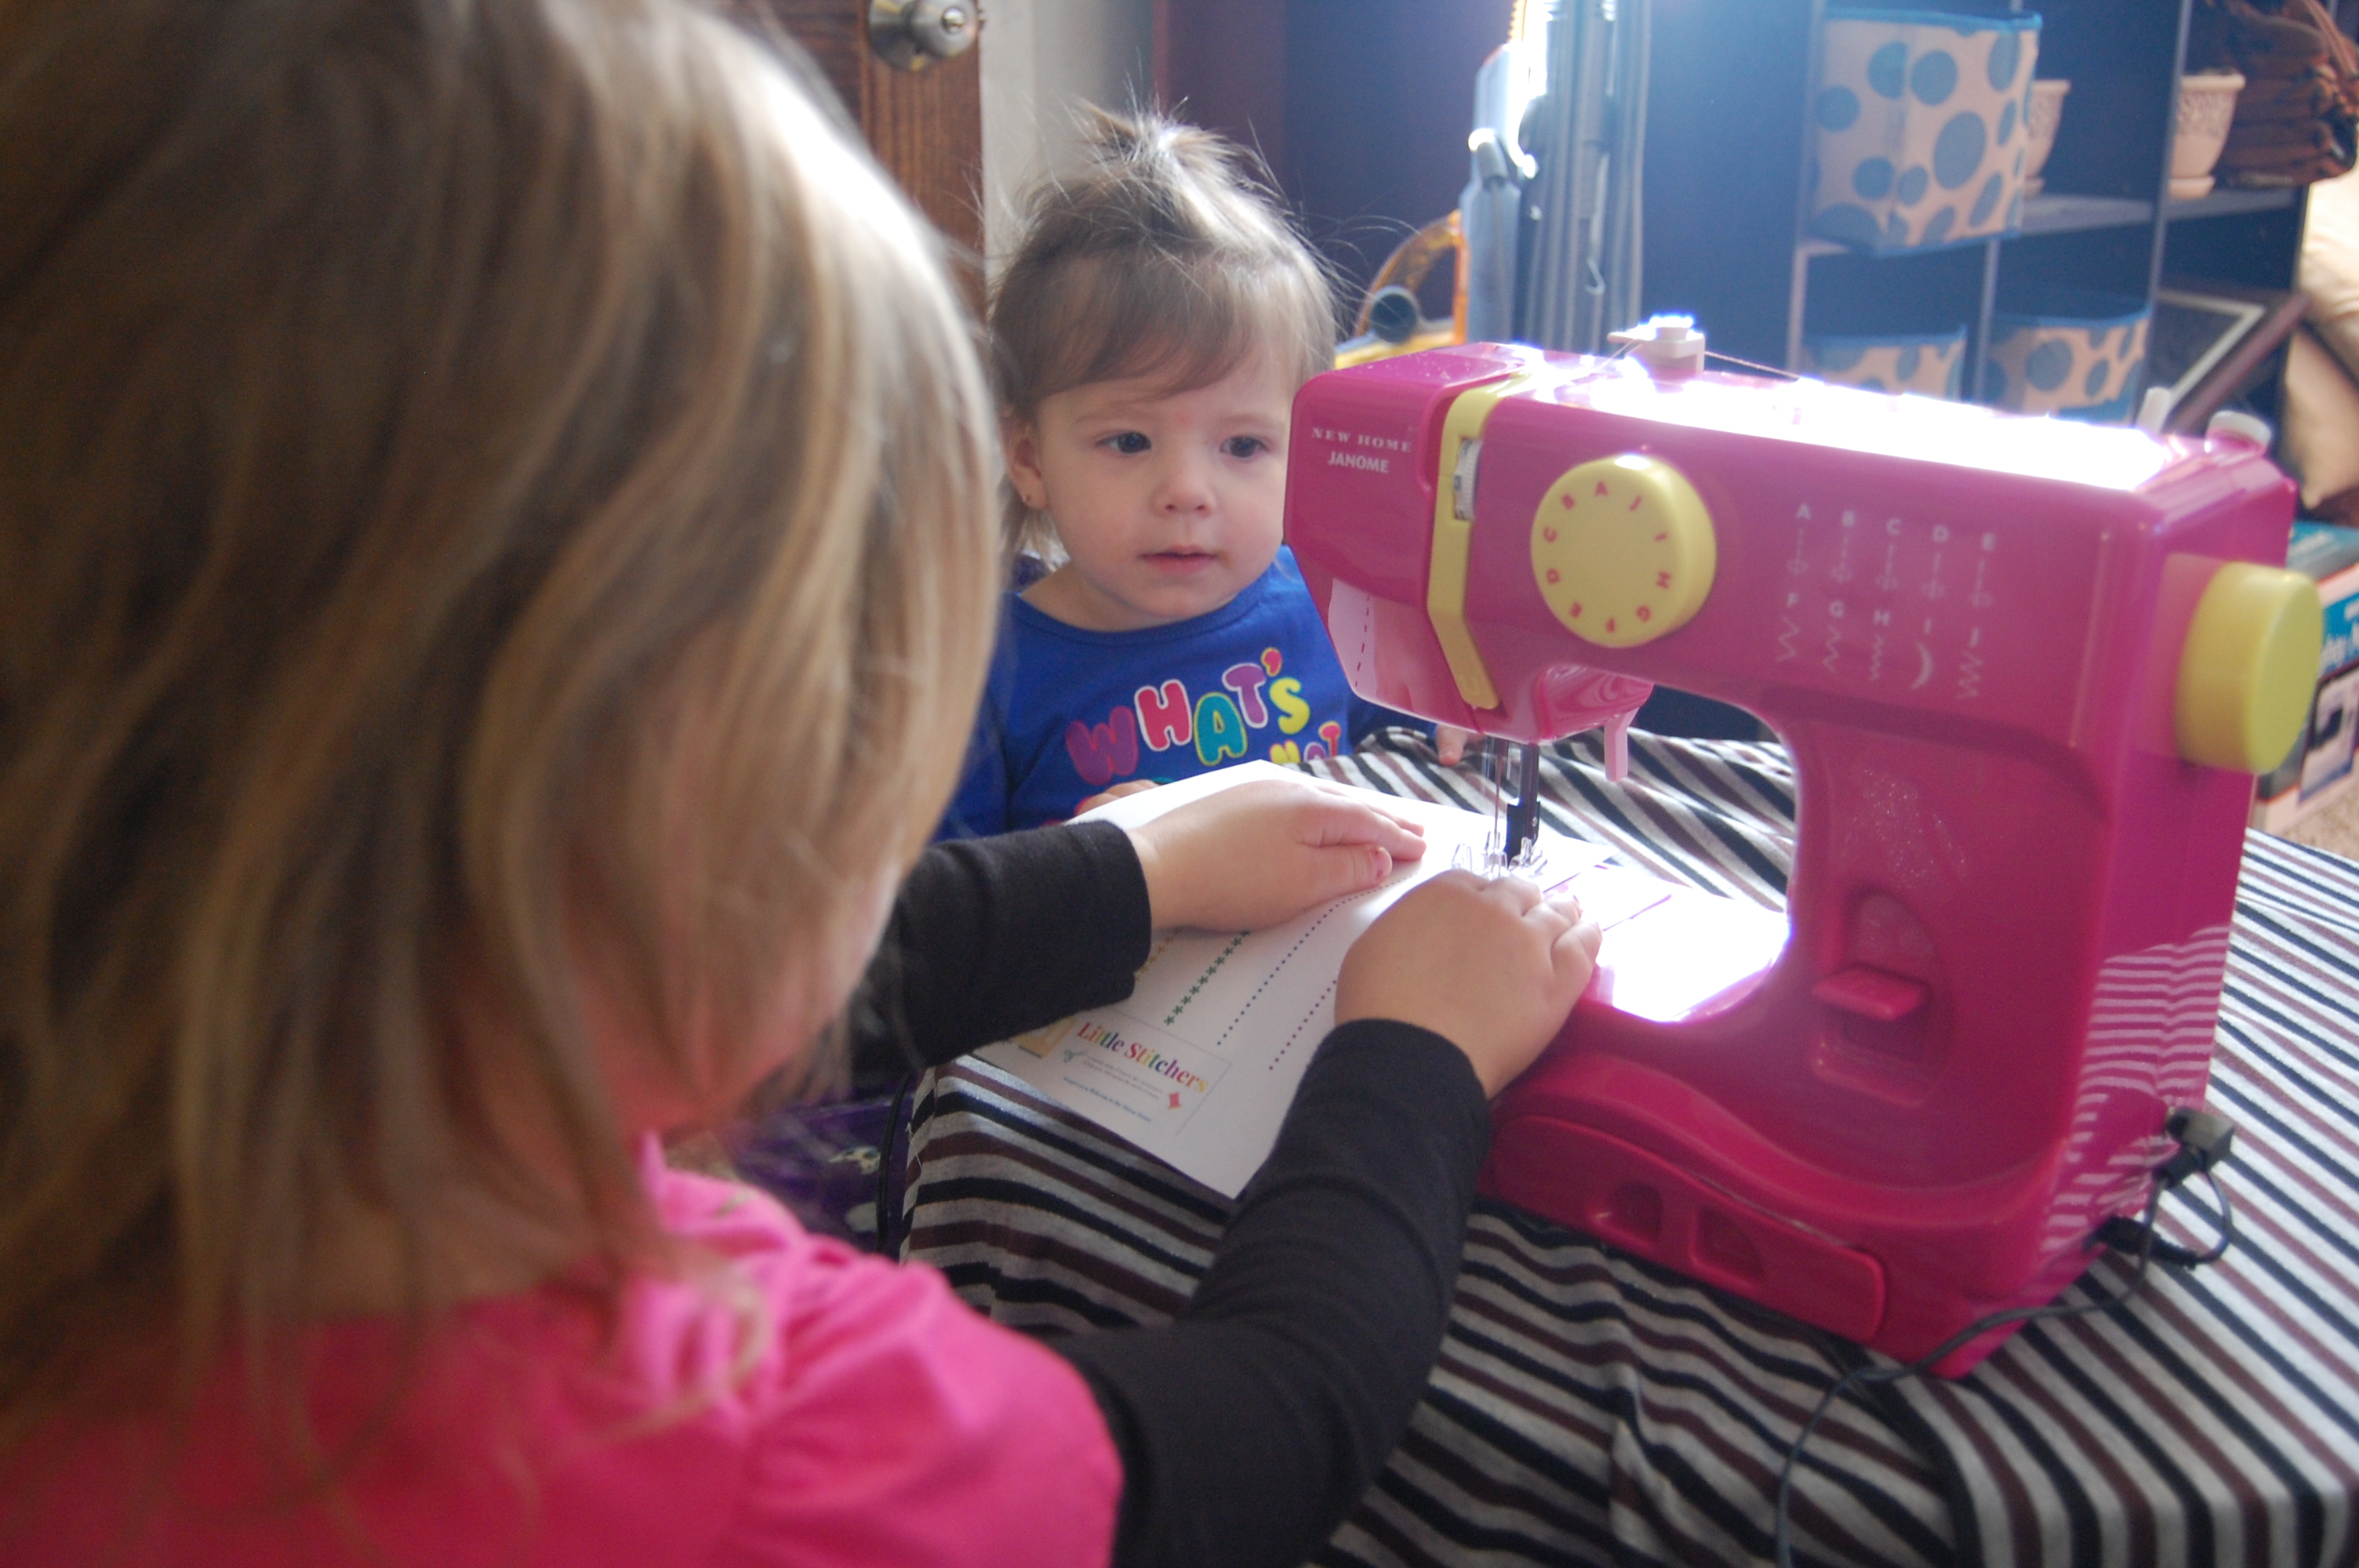
As soon as she opened her present, she was ready to get started! And it didn’t take us long to get sewing. We’ve started following along with a little series on The Mouse House blog called “Little Stitchers,” which begins with teaching kids how to sew straight lines and progresses into easy projects that they can complete with the help or mom or dad!

My girl is a natural. It makes my heart happy to see her enjoying something that I am passionate about. What a fun hobby we can share together ❤
What did I learn in this journey? Skip the toy machines, and the “as seen on tv” machines. Go straight for the real deal. You’ll waste your time and money messing around with machines that will only frustrate you in the end. The Janome was the perfect find for us, but here’s a list of a few other recommended starter machines if you’re looking for something a little different!

